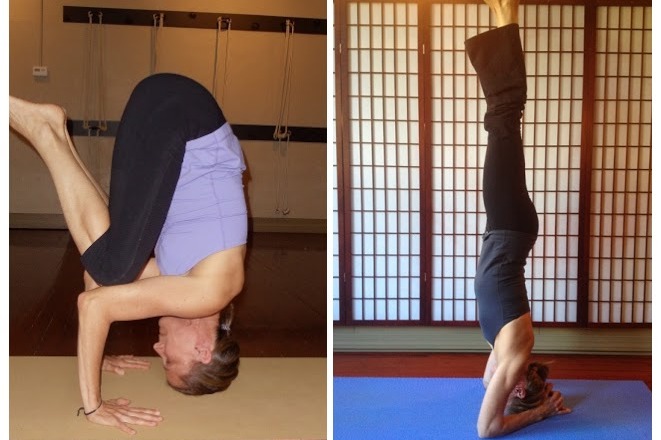
Pose of the Month

Pinca Mayurasana or Peacock Feather Pose

Pinca Mayurasana

Pinca Mayurasana is an intermediate arm balance. It is taught after Headstand and Handstand have been introduced. It is easier to learn to balance in than Handstand because you have more of a foundation to ground you.  It is similar to Headstand, except that it requires more strength and stretch in the shoulders as the head is lifted off of the ground.

Pinca requires the full range of motion in the shoulder girdle, where the arms are raised in the overhead position in line with the torso in 180 degrees of flexion.  It is often a good idea to begin with shoulder stretches when warming up for this posture.   If you are tight in your shoulders, you will feel that this Forearm Balancing Pose is more of a back bend, but it is not meant to be.  There are variations where you can back bend into a Scorpion version, but the basic pose is an upside-down Tadasana on your forearms.When you begin to learn any inversion, there is a tendency to become disoriented.  All inversions in yoga literally turn our worlds upside down.  Can we stay connected when this happens?  Can we breathe and pay attention to where we are and what we’re doing?  Practicing the right angle version of Pincha Mayurasana  in the beginning allows you to get a sense of the pose while being able to remain in your center.  It also helps you build strength. 

Yoga, as defined by Patanjali in his Yoga Sutras, should be practiced without interruption over a long period of time.  This is really important when you start going upside down and balancing on your arms instead of your feet.  Pincha Mayurasana demands this of us.  In return it will repay us with a wonderful sense of strength and confidence.  With the body in an inverted position, prana circulates stimulating the circulatory system, the glandular system and cleansing the mind.  Not only do inversions help us to face our fears, they help regulate the chemistry of the mind; balancing depression and anxiety.  With consistent practice over a long period of time the benefits of this pose are endless.

There is a Japanese word, sat, the meaning of which can be described as the moment right before a performer walks on stage when the heart is racing with the knowledge that anything could happen, the moment right before creation, the moment of crisis. This is very close to the Sanskrit word Satya meaning truth. It is this moment of crisis, this moment of truth that we have the opportunity to confront our fear and to feel the most alive. There is a moment of sat before you perform any pose that scares you.  There can be a moment of sat right before you lift your leg above your head for Pinca Mayurasana.

Vinyasa Pose of the Month – Virabhadrasana III (Warrior III)

Virabhadrasana-3-web-large.jpg

Virabhadra = the name of a fierce warrior, an incarnation of Shiva, described as having a thousand heads, a thousand eyes, and a thousand feet; wielding a thousand clubs; and wearing a tiger's skin.

Virabhadrasana III is said to be a continuation of Virabhadrasana I and it is a much more challenging position.

To come into Warrior II, fist come to Warrior I with the right foot forward and the left foot back.  The feet should be 4 to 4-1/2 feet apart front to back and hip width apart from left to right with the back foot almost facing forward.  Raise the arms overhead and look up. Press the palms together.   Keep the back leg straight as you bend the right knee towards 90 degrees.  Hold this for a few breaths before continuing.

On and exhalation, lean the trunk forward and lay the chest out over the bent right knee.   Take two breaths in this position

Again, on an exhalation, simultaneously lift the back leg from the floor as you straighten the right leg.  Keep the back leg inwardly rotating so that the hips are parallel to the floor.  Make the back leg straight and stiff.  Your goal is to lift the chest and the back leg parallel to the floor.  If this is too much, you can take the arms back like airplane wings, or even rest your fingertips on a block until you develop the strength and flexibility to do the full pose.

Come out of the pose the way you came into it.  (Don’t simply collapse!)  Step back into Warrior I and then straighten the front leg.  Turn the feet so they are parallel and then step or jump the feet together.

This pose encourages you to contract and tone the abdominal organs, as well as the leg and buttock muscles.   This pose conveys harmony, strength, balance, poise and power.  It improves one’s bearing and carriage.

Pose of the Month for April - Bakasana to Sirsasana II

This month we will focus on two poses and the transition between them.  You need to develop proficiency in each one separately before trying to move from one to the other.  Especially since the transition requires that you are able to balance in headstand without the support of the wall.

Sirsasana II

This is also called Tripod Headstand.  Because you are on your hands instead of your forearms, this takes more muscular strength in your arms.  Some people may prefer this headstand over Sirsasana I, or Forearm Headstand, due to tightness in their shoulders that prevents them from raising their arms overhead.  It is nice to be able to do both, they each use different muscles and have different purposes.  This helps to make you a well rounded practitioner.

Sirsasana II prep on left, Sirsasana I on right

Sirsasana II prep on left, Sirsasana I on right

While I would ordinarily ask students to double their mats for extra padding for Sirsasana I, I would not recommend it for this version.  First, we will not be holding Headstand for that long and second, the extra padding makes the foundation less stable which will make the transition from one pose to the other harder.

In order to come into any Headstand, you need to know which part of your head should be on the floor.  The perfect spot is on the top of the head, at the very crown.  This spot is also known as the bregma, which is a Greek word meaning the top of the head. You could balance a book on your head on this spot and it wouldn’t fall off.  Anatomically this is the spot where the frontal bone and parietal bones meet.

How to find which part of your head rests on the floor in Headstand.

How to find which part of your head rests on the floor in Headstand.

Here is a good rule of thumb for finding this spot.  Place the heel of your hand at the bridge of your nose and allow the fingers to curl over the top of your head.  The spot where your middle finger touches is mostly likely the bregma.  However you locate this spot, you need to make sure that your neck rises straight up from this spot when you are in headstand.  Remember that Headstand is just an upside down version of Tadasana.  You would not want your neck to be bent while it was carrying the weight of your body.

Coming into Tripod Headstand

Coming into Tripod Headstand

To come into Sirsasana II, kneel on your mat.  Sit back on your heels with your knees together.  Place your hands on the floor next to your knees. Make sure the palms are flat and the fingers spread wide and your inner wrists are against your outer knees. Keeping your hands where they are, bend forward and place the top of your head onto the floor.  Pause here and make sure you can see your finger tips without having to swivel your head.  If you cannot see your finger tips, your hands are too close to your head and your foundation will not be stable.  The placement of your hands and head should form the three corners of an equilateral triangle.  Check to see that your elbows are as wide as your shoulders and not wider or narrower and that your forearm and upper arms form a right angle.  Please do not attempt to go up into Headstand if these alignment marks are not in place; adjust yourself until they are.  Once you are certain of the alignment of your foundation, proceed with the next step.

Lift your hips up as if you are coming into Down Dog but keep your head and hands where they are.  Keep walking your feet in and your hips up until you cannot walk in any closer.  Bend one knee and place that knee on your elbow and when you are ready, do the same with the other knee.  Rest here for a few breaths.  When you are ready, keep lifting your hips and engaging your core until your knees begin to lift up off of your elbows.  Keep lifting until the back is straight and your buttocks are up in the air, but your knees are still bent.  When you are ready, slowly take one leg up at a time until you are in Headstand.  Take a few breaths here.

Bakasana

Bakasana

To come down, you can either take one straight leg down at a time, or you can try to come down the way you went up; by bending your knees and trying to land your knees on your elbows.  Pause here for a moment and when you are ready try to lift your head off the floor.  You will most likely land on your feet.  This is the beginning of how you come out of Headstand and transition into Crow.

Come into a squat and place your hands on the floor inside of your knees.  Rise up high onto the balls of your feet.  Bend your elbows and work one elbow under each shin, keeping your heels and your buttocks close together.  Begin to tip your weight forward as you move your elbows over your wrists.  If you move your head and shoulders far enough forward, you feet should become light.  It is a good idea to put a blanket, bolster or a block on the floor in front of you in case you tip over.  This can happen, especially in the beginning.  Once you get the hang of it you won’t fall again, it is like riding a bicycle in that aspect.

Typically when you come into Crow, you squeeze your inner thighs and the tips of your toes together and look up.  This squeezing action helps your legs hug onto your arms by engaging the adductor muscles in your inner thighs and the looking up helps you balance.   Once you are balancing, you would begin to push the floor away and try straightening your arms as you draw your belly in and up rounding your back like you do in “cat back”.   Make sure you are comfortable in Crow and can balance for a while before you try the transition into Headstand.

Transitions

It is easier to go from Tripod Headstand into Bakasana at first.  One way to do this from Headstand is to bring your knees down to your elbows and then try to raise your head off of the floor.  You will almost always fall back onto your feet.  The trick is to pause halfway in between.  One of the ways I do this is to flatten my back a little and allow my feet and knees to come apart slightly.  This lowers my center of gravity and makes it easier to get my head off the floor.  Once my head is off the floor, I need to look forward, draw my low belly in and squeeze my feet and knees back together.  If I look forward and press down into my hands I can hover here for a while, if not I just tip back onto my feet, again.  You have to keep trying to slow the motion down until you can stall it.

To go from Crow to Headstand is a little scarier because you are purposefully lowering your head to the floor.  You want to do that softly and in control.  In the beginning, when it might not be so graceful you might can put some padding there like a blanket, block or bolster.  But once you can make the transition smoothly, remove the extra padding under your head as it could get in the way.

Begin by coming Crow and as you get ready to come into Headstand, allow your back to flatten and feet and legs to come apart a little.  This will bring your head closer to the floor so you won’t bump your head down hard.  Tuck your chin and lower the top of your head onto the floor.  Breathe.  Then begin to draw your low belly in and up as you begin to lift your knees off of your elbows and your buttocks up into the air.  Balance here for a moment before lifting your legs up slowly into Headstand.  You can do this one leg at a time, or both at the same time as you are able.  Just make sure that you don’t hold your breath as this builds too much internal pressure.

These advanced moves take some time to master, so be patient and try to have fun while playing safely.

Pose of the Month for March – Focus on the Core

Ardha-Navasana-4-x-6-web-large.jpg

Yoga is a balance of strength and flexibility.  We need to be strong but not rigid.  Being strong gives us a firm foundation and clear boundaries.  Being rigid keeps us stuck, frozen in one place, unable to change and grow.  In being flexible, we need to be resilient, able to go with the flow, but not so flexible that we can be pushed over.  This is as true in our yoga postures as it is in life.

We will begin this month developing our strength by working our core.  Our core connects our upper body and lower body together.  This is so important in keeping our spine healthy and strong especially as we reach and stretch our extremities in different directions. A strong core is helpful when you are reaching in the back seat of your car to pick something up, or if you are practicing arm balances in your yoga class.

Psychologically our core represents our sense of self esteem and integrity.  This is the home of the third chakra.  Tapping into our core means tapping into our internal guidance system.  Can you remain true to yourself as you weigh outside influences?

There are specific exercises that work on the core such as Boat Pose, Plank or Intense Stomach Churning Posture.  But, every pose that we do has some aspect of core engagement.  Your abdominal muscles should be engaged to integrate the actions of the upper body and lower body in poses like Warrior II, Tree or Half Moon.

In any yoga pose there are any number of points you could focus on: the feet, your gaze or drishti, the breath or even the sensations in your skin.  But this month we will focus on the core.  Be prepared to get stronger, but also be prepared to be challenged!

Pose of the month for February - Akarna Dhanurasana

Akarna Dhanurasana

A = towards
Karna = ear
Danurasana = bow

Akarna Dhanurasana literally means "Toward-the-Ear Bow Pose," but is better described as "Archer Pose," since it resembles an archer preparing to release her arrow.

In his book, “Light on Life,” Mr. Iyengar states that, “The body is the bow, asana is the arrow and the soul is the target.”

Your practice leading to Akarna Dhanurasana can be a way of discovering how you use your body and mind to aim towards your target. Is your aim the posture itself? Or, are you interested in going deeper and learning more about yourself?

As with any advanced posture, it is important to pay attention to the quality of your breath and your state of mind as you work through the poses that lead to the final shape.

Here is a sequence of poses to help you on the road to Archer’s Pose and your own inner awareness.

Seated Crossed Leg Posture
This posture is sometimes called Easy Pose. It is the first hip opening seated pose most student encounter. Sit with your shins crossed and your feet under your knees. The pinky toe edges of your feet are on the floor with the soles of your feet facing sideways. Sit for several breaths with your right leg crossed in front and then switch legs. Soften your tongue, jaw and eyes as you settle in and notice if there is any physical resistance.

Goddess
Stand with your feet wide and your toes slightly turned out, knees and toes pointing in the same direction. Pulse up and down a few times and then hold the posture for five breaths. Lengthen from your pubic bone out towards your inner knees and contract from your outer knees into your outer hips as you work your hips open.

Warrior II
The asymmetry of Warrior II makes the hip opening a little more challenging and a little more like the asymmetry of Archer’s Pose. As you deepen the bend in your front knee towards 90 degrees, pay attention to the alignment of your outer front hip and the outer edge of your front foot keeping these two points in line. In every yoga pose we are looking for the symmetry of Tadasana. Find length in your spine and stay erect without leaning towards the front leg. This same lifting action is as important here as it is in the final pose.

Squat
If the heels do not reach the floor, you can prop the heels, but I prefer holding a weight in the hands.  This counterbalances your weight and stretches your calves and quads more.  Squatting uses gravity to open the hips.  Start by keeping your torso more upright, especially if your heels don't touch the ground, but once that happens you can work on reaching forward.

Cobbler
Look for the same opening of the inner thighs as in Goddess and the same lift in the spine as in Warrior II. In the final position of Cobbler’s Pose, the knees are on the ground. Be patient if your knees are higher than that. You may sit on a blanket to raise your hips, lowering the knees by relativity. The hips will be more inclined to open if the pelvis is upright rather than tipping backwards.

Seated Tree
Like Warrior II and Goddess Pose, Janu Sirsasana is more challenging because again it introduces the element of asymmetry. In this version, it is not important to fold forward but rather to work on staying upright and finding the lift of the chest. Work on the opening of the hip that takes the bent knee out to the side.

Maricyasana I
Lifting the knee in Maricyasana I introduces the element of moving the torso forward inside the bent leg.

Happy Baby and Variations
These variations use gravity to bring the knees toward the floor, the same direction the bent knee moves in the upright version. While lying on the floor you get the immediate feedback of how rounded your spine may be. Work the spine long, bringing more of your sacrum to the floor.

Archer’s Pose prep
This version allows you to feel how to lift the leg and pull the foot towards your ear, rather than moving your ear towards your foot, keeping the spine lifted.

Archer’s Pose
This final version of the pose is dependent on the previous stages. If all of those pieces fall into place then it is possible to draw the leg back with the breath and sit up straight and tall.

Notice where you start to lose the breath and equanimity of mind and go back to those stages; be content with exploring those poses. Work with patience, humility and curiosity as you continue the journey to self discovery.

akarna-danurasana-4-x-6-e1517154195700.jpg

Revolved Side Angle Pose

Twists - Parivrtta Parsva Konasana or Revolved Side Angle Pose

Parivrtta-Parsva-Konasana-full-pose-web-large.jpg

Classically, twists are considered to be cleansing postures.  Twisting and squeezing the body moves fluids, wastes and toxins from the tissues and cells.  A rush of new blood surges in when the pose is released, cleaning out your digestive tract and vital organs.  In Light on Yoga, Mr. Iyengar tells us that the contraction of the abdominal organs in this pose aids digestion.  He also states that “the blood circulates well around the abdominal organs and spinal column and they are thus rejuvenated”.  That is one reason why people who suffer from back pain often find relief in twists.  This asana is also said to help remove waste matter from the colon without strain.  As you can see, there is a lot of benefit from doing twists in general and this pose in particular.

Poses of the Month for 2018

The Year in Poses

These are the poses I will be working on this year.  The poses in front of the forward slash are the entry level poses or modifications.  The poses after the forward slash are the more advanced apex poses we will be working towards.

January
Twists - Lunge Twist Twists/Parivrtta Parsvakonasan

February
Happy Baby, Janu Sirsasana/Marichyasana I, Akarna Dhanurasana

March
Core - Navasana and Ardha Navasana/Tolasana, Lolasana

April
6 Block Headstand and Malasana/Headstand to Bakasana

May
Standing Poses - Airplane/ Standing poses - Warrior III

June
Gomukhasana and Dolphin/Gomukhasana and Pinca Mayurasana

July
Triangle/Bound Triangle

August
Baby Dancer’s Pose/Natarajasana

September
Runner’s stretch/Janu Sirsasana B/Hanumanasana

October
Tree Pose & Variations/ Handstand - Adho Mukha Vrksasana variations

November
Hip Openers - Janu Sirsasana, Baddha Konasana /Agni Stambhasana/Padmasana

December
RestorativeInspiration for the year:Yoga of the Subtle Body by Tias LittleThe Yoga Sutras of Patanjali.

Focus on the Core

Ardha-Navasana-4-x-6-web-large.jpg

Yoga is a balance of strength and flexibility.  We need to be strong but not rigid.  Being strong gives us a firm foundation and clear boundaries.  Being rigid keeps us stuck, frozen in one place, unable to change and grow.  In being flexible, we need to be resilient, able to go with the flow, but not so flexible that we can be pushed over.  This is as true in our yoga postures as it is in life.We will begin this year developing our strength by working our core.  Our core connects our upper body and lower body together.  This is so important in keeping our spine healthy and strong especially as we reach and stretch our extremities in different directions.

A strong core is helpful when you are reaching in the back seat of your car to pick something up, or if you are practicing arm balances in your yoga class.

Psychologically our core represents our sense of self esteem and integrity.  This is the home of the third chakra.  Tapping into our core means tapping into our internal guidance system.  Can you remain true to yourself as you weigh outside influences?

There are specific exercises that work on the core such as Boat Pose, Plank or Intense Stomach Churning Posture.  But, every pose that we do has some aspect of core engagement.  Your abdominal muscles should be engaged to integrate the actions of the upper body and lower body in poses like Warrior II, Tree or Half Moon.

In any yoga pose there are any number of points you could focus on: the feet, your gaze or drishti, the breath or even the sensations in your skin.  But this month we will focus on the core.  Be prepared to get stronger, but also be prepared to be challenged!

Restorative Poses – Cobbler’s Pose

Supta Baddha Konasana

Supta Baddha Konasana

Supported Cobbler’s Pose is one of the most important restorative poses. Physically it opens the chest, abdomen and pelvis. These areas are often restricted by how we sit and stand, the shape of our chairs, the fit of our clothes and how much time we spend looking down into our hand-held electronic devices. Psychologically, this pose allows for deep opening with safety and support. In the Yoga Sutras Patanjali writes about hiranyagarbha, the great golden womb of the universe. Patanjali teaches that the entire universe is held within this golden womb.  As you practice Supported Cobbler’s Pose allow yourself to enter into this primordial space of complete rest and ultimate protection.

There are many versions of Reclined Cobbler’s Pose. In the picture, I am demonstrating the simplest. I have used a long rolled blanket folded in a “U” shape around my feet and hips to help draw my legs towards my torso and cradle them there. In this version, I am lying flat on the floor. This is nice to do lying on a carpeted floor with a blanket over you to keep warm. Use an eye-pillow if you have one. Put on some soothing music, if you like and set a timer for anywhere from 5 to 15 minutes. I have been playing a choir singing the mantra So-Hum. You can find it here on youtube.

Restorative Poses

For the month of December we will focus on restorative poses.

That doesn’t mean that we will turn our vinyasa classes into restorative classes. It just means that we will include a restorative posture during every class.

Some students have a hard time with restorative postures. They might not see their value. After all, you are not really “doing” anything in a restorative pose. But, restorative poses are deceptively effective if you give them a chance.

Take Reclining Hero Pose, for example:

Supta-Virasana-4-x-6.jpg

Some students can lie down in this pose fairly easily, but can’t hold it for 2 minutes. That is an example of what I would call deceptive flexibility.  This is when you can force your body into a position but you cannot maintain it because it is not comfortable. You are not really that flexible. That is an example of “doing the pose”. If you can cultivate a sense that you could be in a posture forever, then the pose can do you. Your body can reap the benefits of the pose and you can reset your resting muscle length.

If you are willing to experiment with props and support your body in a pose, you can cultivate a sense of serenity and equipoise in a pose and you might feel that you could stay forever, or at least 2 to 3 minutes with ease. In modern exercise physiology we have learned that you need to hold a stretch for between 30 and 120 seconds in order to change the resting length of your muscles.

Restorative postures are the perfect balance to busyness; the perfect antidote for this holiday season. Give them a try this month.