“Successful aging, in large part depends on good health. So stay healthy. Posture is important
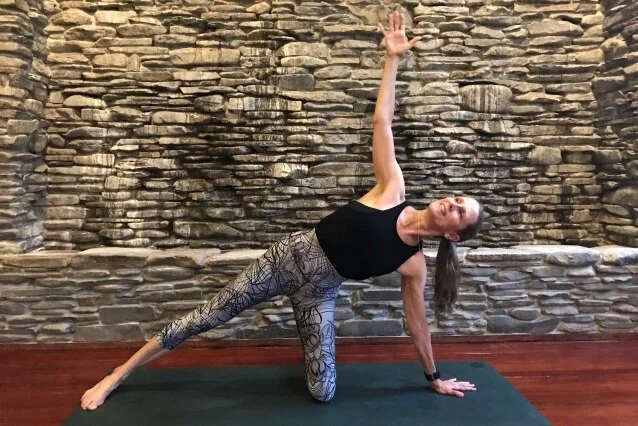
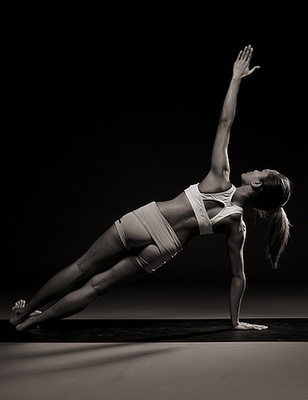
A good, strong Side Plank is the basis forVisvamitrasana. As such, I’d like topoint out some helpful and some not so helpful variations for this lateral armbalance.
Side Plank is a great pose for core strength and balance,but it can be a difficult pose for beginners or for people with shoulderissues. There are several modificationsfor this pose: for the arms and shouldersand for the legs.
This clicking noise often happens when you twist. Twisting involves rotation of the spinal vertebrae. Each vertebrae has a couple of degrees of possible rotation. The vertebra in the neck have the most movement at an average of 7.9 degrees for each vertebra. The thoracic vertebrae average only 2.9 degrees each. The lumbar vertebrae have the least amount of rotation at approximately 1 degree each.*
Each vertebra touches the vertebrae directly above and below it with a part called the articular facet. There are four of these parts, two on the upper part of the vertebra and two on the lower part. These facets help keep the vertebrae aligned. (There are also many muscles and ligaments that keep the vertebrae aligned, so there is no danger of them slipping entirely out of place!) But in certain twisting actions these facets can slip against each other making this clicking noise. I know I felt these same slight movements and heard these sounds and in my own body. While these sounds are relatively harmless when they happen occasionally, they are not something that should happen every time you twist.

It is important to not use a lot of leverage when you twist. The arms are used in most seated or standing twists and gravity is used in most supine twists. You need to be judicious in the use of the arms to let them add ease to the movement of the twist and in the engagement of the muscles rather than being aggressive in forcing the body to twist further. This over-rotating happens at certain vulnerable points in the spine, such as at the juncture of T-11 and T-12.
This is especially important in supine twists where gravity is pulling on the weight of the body. If the oblique muscles are not strong enough and you allow your body to drop over into the twist as opposed to lowering it into the twist, you can create a lot of shear force between the vertebrae and those facet joints will click against each other trying to hold the spine in good alignment. When twisting with gravilty, lower the body part slowly and with control. Make sure you are keeping your abdominal muscles engaged as you twist. For example, when you are lying on your back and twisting your legs to the right in Jathara Parivartanasana, as you lower your legs to the right, turn your navel to the left. If you only go as far as you can slowly and with abdominal control, and your opposite shoulder staying on the ground, you will find that your back no longer clicks. You also may be surprised that you don’t go very far! This is ok. Build your strength and range of motion over time. Flexibility without strength creates instability.
If you sit in an easy cross legged pose and rotate to the right, slowly without using your hands or arms, you may find that you do not go very far. This is the limit of your range of twisting using your muscles. Try twisting to the left to see if there is any difference between one side and the other. You probably don’t get that clicking noise when you do this upright twist. Take this knowledge and awareness into twists where you use your arms and/or gravity and twist mindfully.
There are two other things that are important in twisting, one is to keep your spine long and straight. You don’t want to increase the leverage on any given vertebra by bending it as you twist it. The other thing is to draw your belly button towards your spine and engage your muscles in the opposite direction of your twist.
You want to develop your core muscles in twisting and to only twist as far as you can go without that clicking noise. Your strength and range of motion can increase over time. Try these exercises and see if that stops or reduces the clicking in your spine. Let me know how it is working for you, or if you have any further questions by leaving your comments in the space below this post.
*Mel Robin, A Handbook for Yogasana Teachers: The Incorporation of Neuroscience, Physiology and Anatomy into the Practice.
If you have chronic pain in your knees, if they “snap, crackle, and pop” when you bend or extend them, or if they tend to hyperextend, you may have improper tracking or “dislocation” of the kneecap. This misalignment causes the most common kind of chronic knee pain and damage to the knee joint, which develops slowly over time. Yoga knee therapy might be able to help.
The most common source of knee pain is due to improper tracking of the knee cap or patella. The patella is a bone that protects the knee and helps to increase the contracting action of the quadriceps muscles in straightening the leg. It is supposed to slide in a groove in the femur as the knee bends and straightens. If this movement is not smooth and the kneecap goes off track (and it can), it can grind away at the cartilage underneath, destabilizing the knee. The ensuing pain is the most common reason for knee replacement surgery because people think that the cartilage is totally gone. It might not be completely gone and it can grow back, although it does so very slowly. However, if the mechanics of the knee is not improved, the rate of wear and tear will outpace the rate of healing.

The knee cap can move out of balance when there is an imbalance in one of the four muscles that make up the quadriceps group. All four of the quadriceps muscles connect to the kneecap and through a common tendon to the top of the lower leg, or tibia. It is a common occurrence for the inner quad muscle, vastus medialis, to be weaker than the outer one, vastus lateralis. When this occurs, it causes the kneecap to be pulled sideways by the stronger muscle.
To counter balance that, there is an exercise you can do:

Sit on the floor with your legs stretched straight out in front of you. Place a rolled up blanket or a mat under the back of the painful knee. In this supported position, the knee will be bent. Externally rotate the foot a few degrees so that the inner arch is facing towards the ceiling and the inner thigh is rotated up to the ceiling. This will focus your efforts on the inner quadriceps muscle called the vastus medialis. Smoothly contract the quadriceps to straighten the leg. Hold the contraction with the heel off of the floor for about three seconds before gently lowering the heel back down to the floor. Repeat this for 10 reps. Rest and repeat this exercise 3 times. If you have access to a gym and a leg extension machine, you can do this exercise that way, too. Sometimes the weight in the machine is not light enough if you are in pain, in which case do the exercise over the rolled blanket until your knee becomes less painful and it gains strength.
How does this relate to your yoga poses? The first way is your ability to straighten your leg and lift the kneecap in straight leg poses and the second way is to pay attention to the alignment of your knee over the ankle in bent knee poses.
For the straight leg version, this can be done in stages. First, do the exercise above where you straighten the leg over a rolled blanket or mat. Then try to straighten the leg while sitting in Dandasana, or staff pose. Place the leg straight against the floor and contract the quad, straightening the leg. Make sure you keep the heel grounded otherwise you are hyper-extending the knee. Can you lift your kneecap? This is the easiest way to learn to lift the kneecap. Next try to lift your kneecap in Prasarita Padottanasana (Wide Legged Forward Fold) Then try it in Trikonasana, (Triangle Pose). It is harder to lift the kneecap of the front leg in Trikonasana but it can be learned and it is a safer way to practice straight leg poses.
For the bent knee poses it is important that your shin is vertical. It doesn’t really matter how deep of a bend you have. That is dependent on your strength and flexibility. It is more important that you knee is over your ankle. This needs to happen in two planes: the front plane and the side plane.
In the front plane:

These three images show the relationship of the knee and the ankle. The picture on the left shows correct alignment with the knee lined up over the second toe. The picture in the middle shows the knee pulling to the pinky toe side of the foot. This works the outer quad, vastus lateralis, which does not help strengthen the inner quad. The picure on the right shows the knee caving in toward the big toe side of the foot. This creates wear and tear on the inner knee and further weakens the inner quad, vastus medialis.
In the side plane:
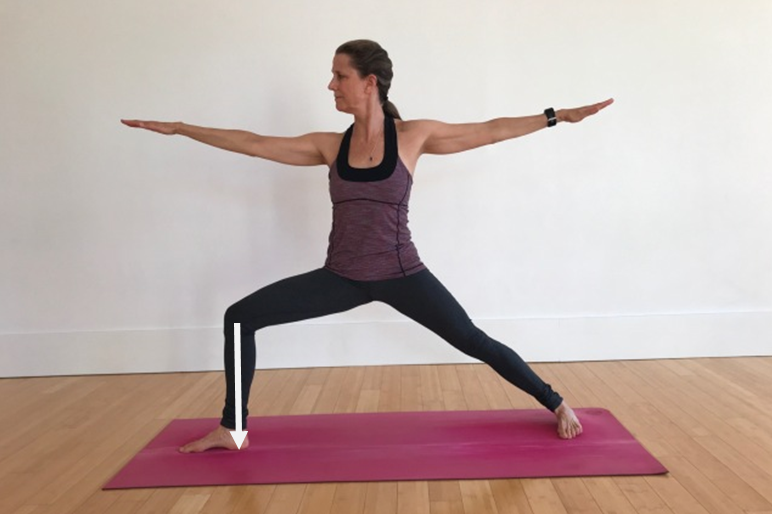
From the side view, the knee should be over the ankle. Often the knee is behind the ankle which creates compression in the knee joint. Rarely is the knee past the ankle as this is harder to hold and it creates a lot of pressure in the knee.
As you can see, practicing yoga can be very beneficial for your knees if you pay attention to your alignment. It is important to have a teacher who is aware of these subtleties and can help you work to enhance the natural therapeutic benefits of the poses.
The word yoga means “to come together, to unite.” This refers to tying the mind, body and breath together. When we do our yoga poses we strive to do them intelligently; to put our mind in our bodies. For example; to know how rolling the heads of the arm bones back lifts the chest. The practice of yoga helps our bodies learn to feel these things. We endeavor to make our whole selves shiny (with an inner radiance), bright and alert. When our mind is not in our bodies, that part of our body becomes dull and lifeless. This intelligence is what differentiates yoga from merely stretching. And it is this inner inquiry that helps us to make progress on the path of yoga. If we are not aware of what we are or are not doing, we can stay stuck. Awareness always proceeds change.
There are a lot of things we could be focusing on in any yoga pose, but today I want to shine a light on the shoulders. I noticed things shifted in my yoga practice when I began to look at my shoulders and realize that I was slumping. My teachers would say things like "Take the heads of your arm bones back. What does that mean? In my Anusara training the concept used was called “Shoulder Loop”. The cueing went like this: “Side body long and the heads of the arm bones back.”
What does that mean to make the side body long? And why should we do this?
When we do yoga we not only exercise the muscles, which pull on and affect the bones, but the poses also affect our nervous systems and our internal organs. In everyday life we tend to slump. Some of that is because we work at keyboards (as I am doing right now) Or, it can be a form of protection of the heart because life is hard and we don’t want to be vulnerable. Slumping compresses our lungs and heart making it harder to take a full breath and making it harder for the heart to pump blood. When the chest is caved in, it indirectly puts pressure on the abdominal organs, making it harder for them to function as well. The decrease in oxygen intake and compression of the organs makes our brain dull and we feel sluggish.
How do you make the side body long? Lengthen your side waist from your hips to your armpits by lifting the heads of your arm bones up towards your ears. Then roll the heads of the arm bones backward allowing your scapula, or shoulder blades, to settle on your back close to the spine. Release the scapula down towards your waist without letting them slide apart again. This releases your shoulders away from your ears and allows them to settle into a more natural position. Make sure you don't let the shoulders roll forward again. The next time you find yourself slumped over your computer keyboard and you are starting to feel sluggish and sleepy, take one minute to sit up straight and try this. Remain in this upright position and breathe; notice how it feels. This is how long it takes for your blood to circulate through your body. In just one minute, with full, deep breathing you can 100% oxygenate your blood. Notice the effect this has on your body and your mind.
I wanted to clearly illustrate what it looks like with my shoulder blades rounding forward and with them rolled back so I took the pictures while lying on the floor so you could see the difference more clearly. Can you see the difference? What do your shoulders look like? Now can you do this while standing up?

Shoulders rounding forward

Shoulders back and down
This is the beginning of being able to open the upper chest and move the upper thoracic spine into the body. This starts in Tadasana, but is especially important in back bends. Next week I will continue this exploration into Bridge Pose.
I often get asked about yoga for various minor ailments. One of them is plantar fasciitis.
From the Mayo clinic:
Plantar fasciitis (PLAN-tur fas-e-I-tis) is one of the most common causes of heel pain. It involves pain and inflammation of a thick band of tissue, called the plantar fascia, that runs across the bottom of your foot and connects your heel bone to your toes.
Plantar fasciitis commonly causes stabbing pain that usually occurs with your very first steps in the morning. Once your foot limbers up, the pain of plantar fasciitis normally decreases, but it may return after long periods of standing or after getting up from a seated position.
Plantar fasciitis is particularly common in runners. In addition, people who are overweight and those who wear shoes with inadequate support are at risk of plantar fasciitis.
Here are some simple exercises you can do that may help:
Massage the bottom of your foot with a tennis ball. Do this while standing and set a timer for 5 minutes. Less than that just isn't enough. Some people say to use a golf ball you keep in the freezer. Because the tennis ball is softer, it may be easier to roll. If you can tolerate a hard golf ball, go for it. Because you have 5 minutes, work your whole foot–the heel, ball of the foot and arch. Vary the pressure. Do both feet, 5 minutes each foot. Your other foot will thank you.
Pick things up with your toes, such as the golf ball or marbles, or scrunch up a tea towel with your toes. This strengthens the arch. One of the causes of plantar fasciitis is weak arches. Often, this can be caused by wearing shoes with too much arch support and walking on engineered, smooth surfaces. Wearing shoes with good arch support may relieve the symptoms, but it doesn't get at the root of the problem.
You might not be able to do this one at home unless you have a 45-lb weight plate hanging around the house. So, head on over to the gym. You may need to bring your yoga mat with you as you will need to kneel on the floor. Find a quiet corner. Sit on your heels with your legs parallel and your toes pointing straight back. This pose is called Vajrasana. Have someone place a 45-lb. weight plate on your heels and calves. The plate should be pressing on your heel exactly at the same point as the pain is. Sit back on the weight plate. Try to sit for a few minutes, up to 5, but not longer. Some people may not be able to do this because of the pressure on the heel can be intense. But the way it works is that it relieves pressure on the plantar fascia. Some people love this.

I have never had plantar fasciitis, but my husband has. He swears by the Strassburg sock.

The yogic version of the Strassburg sock is to do Pyramid Pose with your front foot up the wall:

Let me know if this works for you. Leave a comment below!
Because I have a little scoliosis, I have a twist in my body. When I stand, one shoulder is higher than the other shoulder. Sometimes it bothers me. As a yoga teacher I feel like I am “supposed to be” more symmetrical. But I notice the same thing, in varying degrees, in my students, friends and even in pictures of other people. Most people are not quite symmetrical when they stand.
Vasisthasana
We don’t do things symmetrically. We have a dominant and non-dominant side. We hold our children, push a vacuum cleaner, rake, sweep, shovel and do a number of other activities on one side. Try brushing your teeth with your non-dominant hand! This preference of one side over the other sets up a functional asymmetry in the body. Knowing this can be a good thing. It can help you be aware of your asymmetry and you can work to correct it. You can even try, as I sometimes do, to do all of those activities on your non-dominant side.
Years ago, I asked one of my yoga teachers for help with my scoliosis. She gave me several practices to do. One of them was to practice Side Plank on my convex side twice as much as I practiced it on my concave side. (If you don’t know which is your convex side, it is the one that is harder for you to bend towards.) Just this week, a friend forwarded an article to me that cites the benefits for improving your scoliosis by practicing Side Plank for a minute and a half* daily on your convex side. The article suggests you do this for two months to notice an improvement. (And then please don’t stop! It’s just like cleaning your house. You can’t expect to vacuum once and be done with it. You have to do it regularly.) Check out the article by clicking here. Let me know what you think.
*Please start slowly, maybe 10 seconds at first and build up by a few seconds each week to get to a minute and a half. There are also modifications. If you need help I would be happy to work with you privately to get you going. Contact me by clicking here.