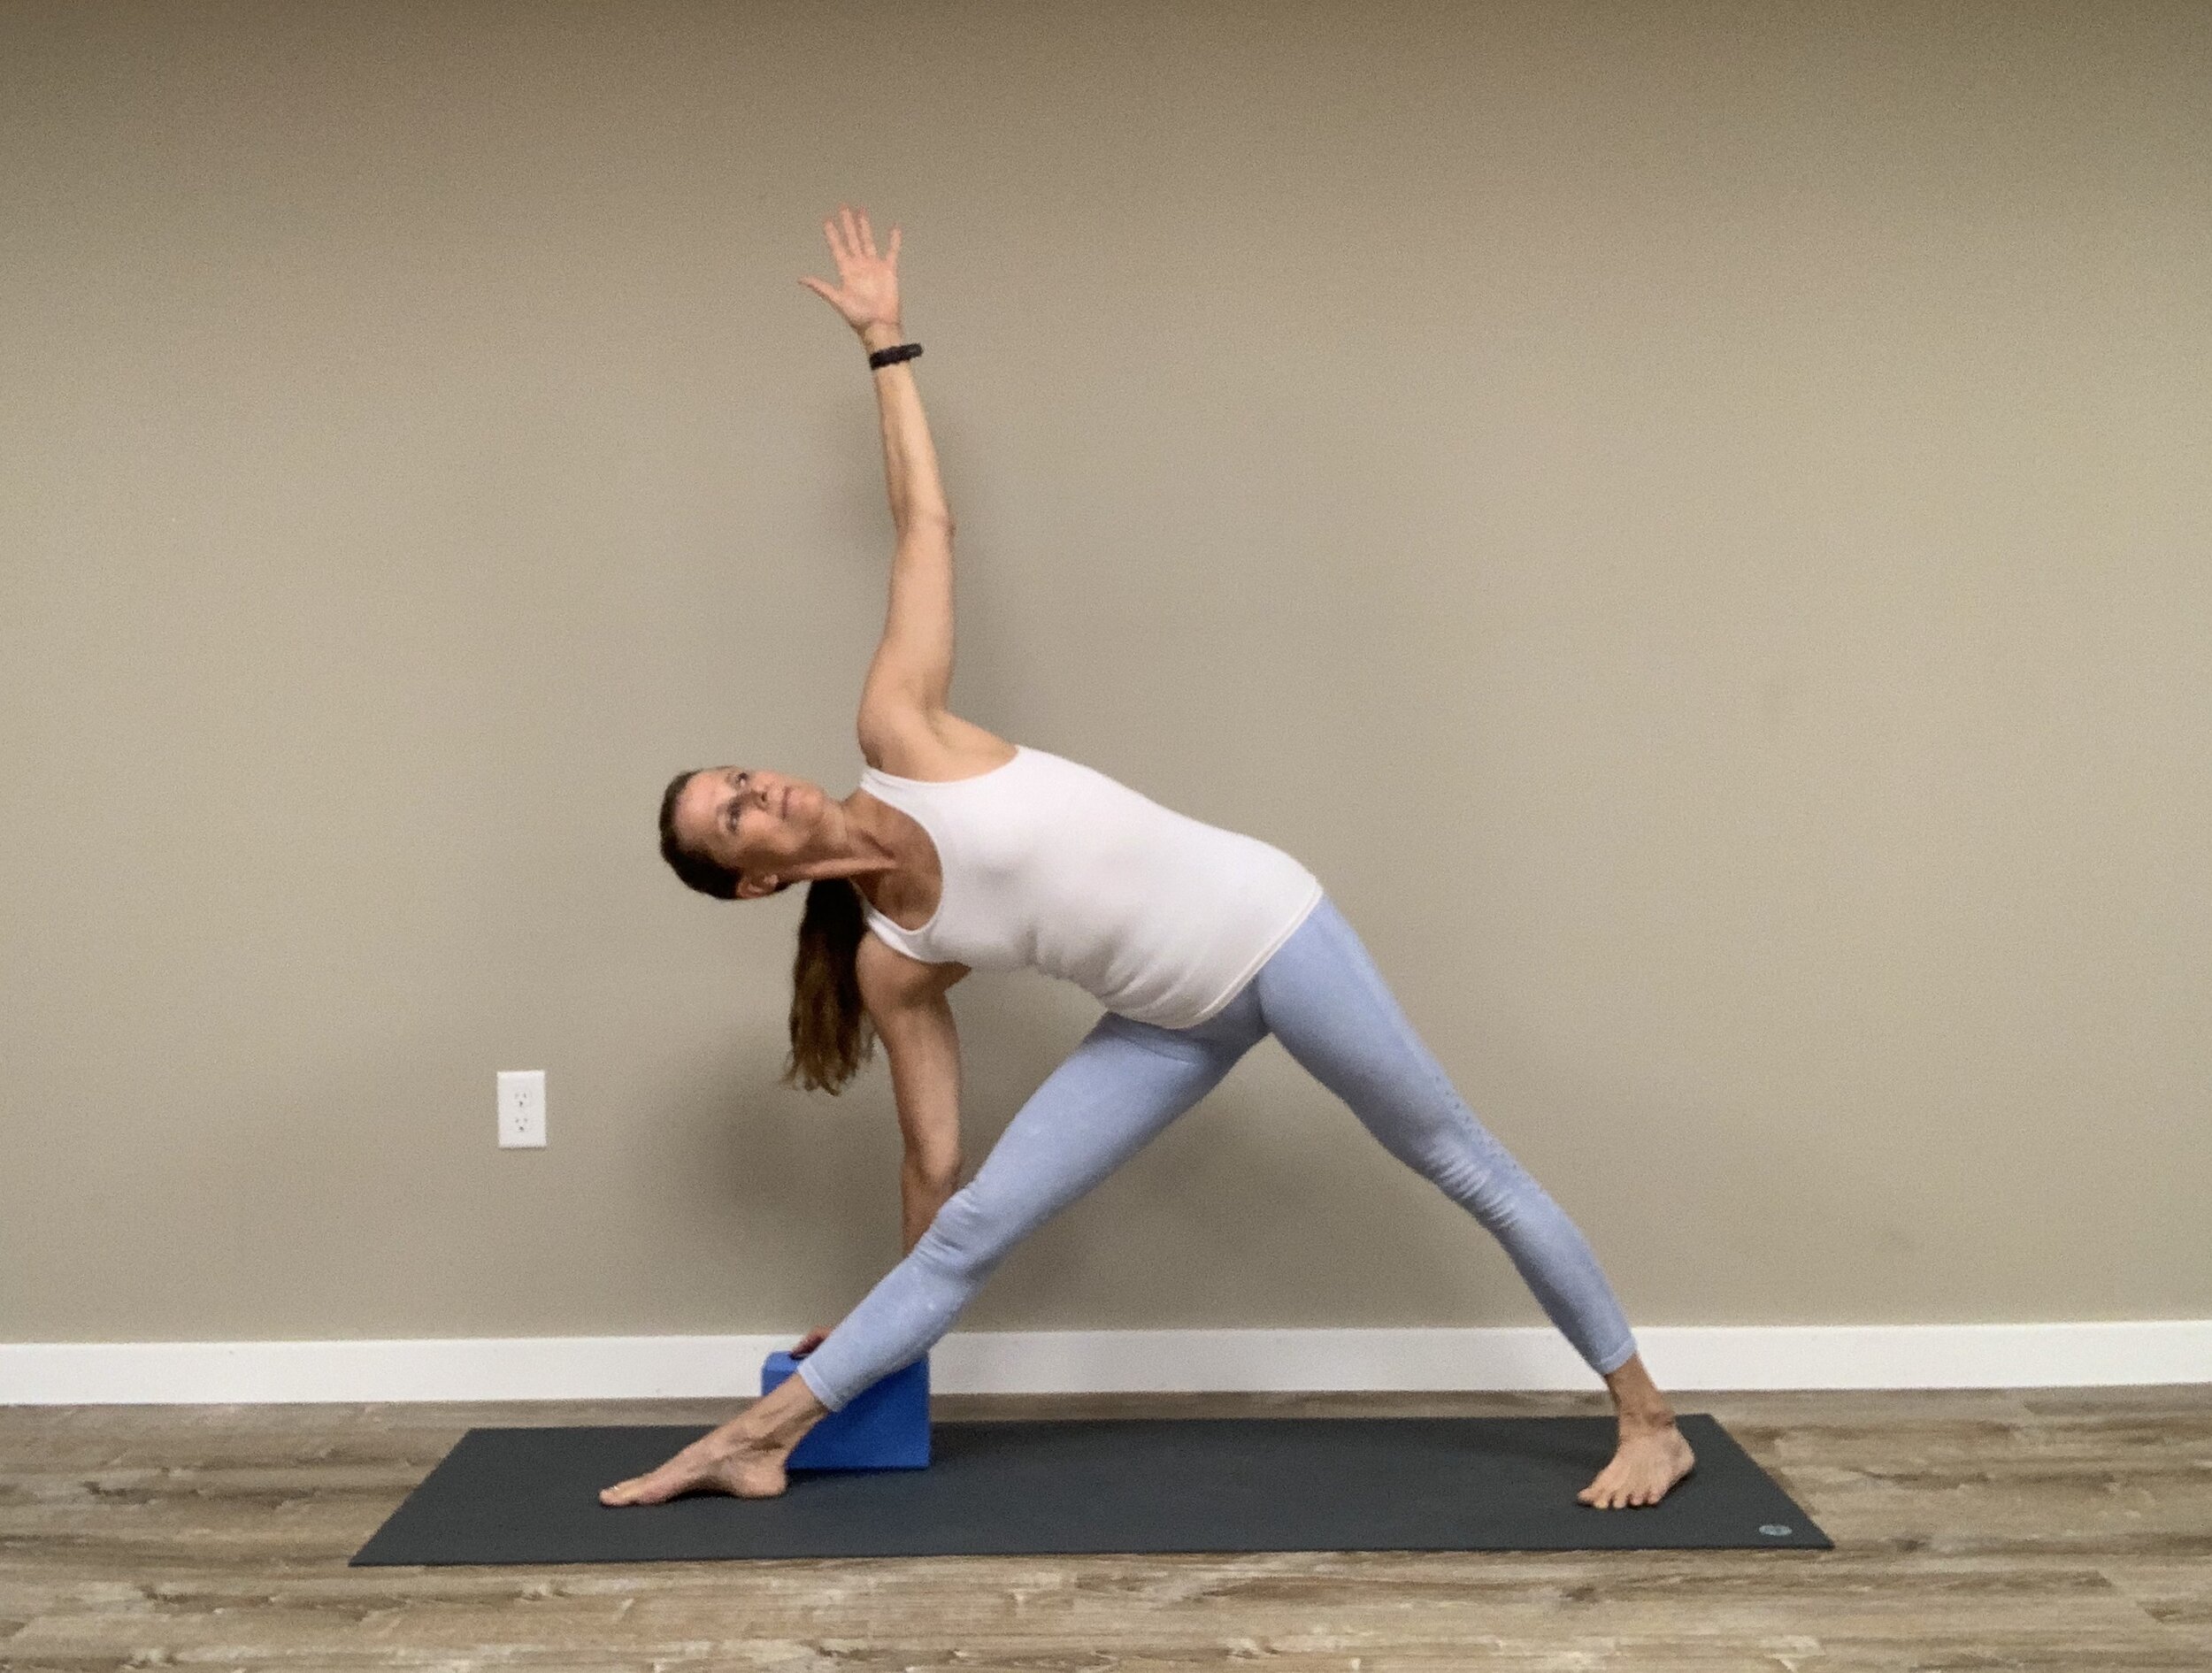
What is more important? Getting your hand to the floor in Parsva Konasana or turning the trunk upwards and establishing the straight line from the pouter edge of the back foot up to the the fingers of the upper arm?
Utthita Trikonasana
Utthita means extended and Trikonasana means Triangle. This is Triangle Pose, one of the most basic standing poses and often one of the first poses taught to beginners. It is the pre-cursor to many other poses including: Virabhadrasana II (Warrior II), Utthita Parsva Konasana (Side Angle), Ardha Chandrasana (Half Moon), Virabhadrasana III (Warrior III) and Virabhadrasana I (Warrior I) and Parivrtta Trikonasana (Revolved Triangle)
The basic instructions are:
Stand in Tadasana in the middle of your mat facing the long edge. Bring your hands up to the center of your chest, in line with your collar bones and on an inhalation step or jump your arms and legs 3-1/2 to 4 feet apart.
Turn your right leg and foot 90 degrees out to the right. Look to see that the right foot is pointing straight out to the right and that the center of the right heel is in line with the arch of the back foot. Lift the kneecaps engaging the quads. Keep the arms extended and the chest lifted. The torso should be centered between the legs.
On an exhalation, reach the right arm out to the right, stretching the right side of your torso out over your right leg, tilting your hips as you go. Keep the left hip rolling up and back on top of the right hip. When you can’t go any further, reach the right hand down to touch your shin, or a block, or the floor on the outside of your leg. Turn your head and look up at your top arm.
Keep weight on the inner edge of your front foot and the outer edge of your back foot. Keep the kneecaps lifted as you breathe normally.
On an inhalation, keeping the kneecaps lifted, press down into the inner edge of the front foot and outer edge of the back foot reach out through your left hand and bring yourself up. Turn your right foot in. Repeat to the other side.
When finished, step or jump your arms and legs back together and return to Tadasansa.
This gives you the basic instructions, but it does not tell you exactly where the body is in space. It is possible to follow these instructions and not end up in a well aligned pose. For this, you need to be able to look at yourself in the pose.
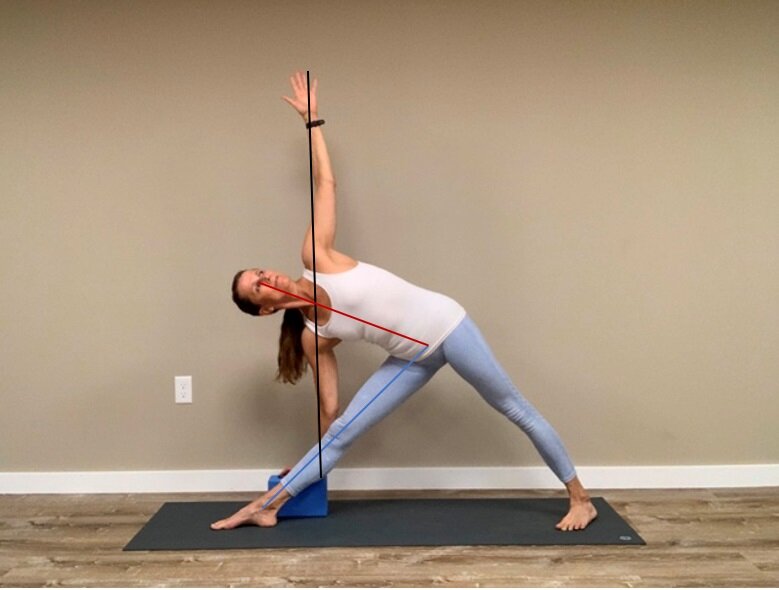
Triangle Pose with alignment points
Notice how far apart my legs are. Often the first thing a student needs to learn is to open the legs wide apart. For this you need the flexibility to spread the legs and the strength to balance in this stance.
See the relationship of my front arm to my front shin. My forearm crosses my shin near my knee. You can’t see this from this angle, but my forearm is also “gating” my front shin; which means that I am pressing my forearm against the shin. This helps to keep the weight on the inner edge of the front foot.
Notice that my arms are in a vertical line with my top hand over my shoulder and ultimately in line with my bottom wrist. There is air and space in my top armpit. My spine and the sides of my waist are in a straight line and not domed.
From the head view, you can see that my torso is in line over my front leg, not inside of it or outside of it. Most students bring the torso to the inside of the front leg in order to get the hand to the floor, mistaking that for the goal of the pose. But all this does is to cause the hips to swing out and the torso to rotate to the floor.

Torso is in line over front leg. See how the wrists and shoulders are in line and they are slightly to the outside of the front leg. This is correct alignment.

Torso is leaning inside of front leg. See how the hands are back and the shoulders are forward. The arms look skewed. This is incorrect alignment.
The other thing to notice from the front view is that I am very two-dimensional. In other words, my body is still in Tadasana even though it is tipped to the side. My buttocks are not moving backwards, my head is not drifting forward and my torso is in a vertical plane. This is the goal of the pose, not getting the hand to the floor.
Another subtle thing to notice is that while my torso is over my front leg, my arms are on the outside of the front leg. In other words, my arms are slightly behind my torso. This is the same as it would be in Tadasana. A lot of shoulder problems come from not being able to roll the shoulders back and lift the base of the throat. Look to see that my arms are vertical in this plane as well.
The gaze should be looking into the top hand, or as close as you can to it. This is easier if the top hand is not drifting behind you. Make sure that your head is in line with your spine and centered between your shoulders. Don’t drop the head backwards to look up at your top hand. The last thing I want to mention is that the head is turned to be looking up at the top hand. I like to give the cue to look at your right hand with your right eye and try to see with your left eye what your right eye can see.

Head in line with the spine.

Head dropped. Bottom ear is closer to the bottom shoulder.
Take a look at yourself in a mirror as you do Triangle Pose and notice where your body is in space.
Utthita Parsva Konasana or Extended Side Angle Pose
The Bhagavad Gita gives us two definitions of yoga: Yoga is skill in action (B.G. 2-50) and Yoga is equanimity of mind (B.G. 2-48).
One of the best ways to learn more about your yoga poses is by either practicing in front of a mirror, having someone take a picture of you in a pose, or looking at yourself on the screen in a zoom class. This is often very humbling. We are often not as advanced as we think we are! I know I have often been surprised by the fact that what I look like in my mind and how I look on screen are very different. Seeing yourself is a great way to learn and and develop skill. Awareness is always the first step in growth.
Side Angle Pose is a building block towards other advanced poses so it is important to work on and understand Parsva Konasana.
Take a picture of yourself in Side Angle pose from the front and from your head side. Then compare your pose to an example of a well done posture. Be wary of some of the poses you find online on Facebook or Instagram. While you may find some very correctly executed postures, there are many more not so well executed. Like these examples:

Here my front thigh is lower than horizontal and my back leg is collapsing.

Here I have collapsed my neck and shoulder on the lower side and I am not a straight line from my outer back foot up to my top fingers.
For skillfully executed postures, I recommend looking in Light on Yoga by BKS Iyengar. Or, for an online source click here to see a three-dimensional view of Parsva Konasana.

Mr. Iyengar demonstrating the alignment of Parsva Konasana
How does your pose measure up? Can you look at yourself critically but lovingly? Don’t beat yourself up by how bad you might think your pose looks. Instead, look at what you are doing that is good and work to build on that. Look at where you need to move to. Knowing where you are helps you move towards where you want to be. Remember the definitions of yoga refer to skillful action and equanimity of mind, not perfection in asana.
Sometimes students look at a pose and see certain things that they attach importance to, such as the hand on the floor in Side Angle Pose. While the hand on the floor is a goal, you have to first look at the skill of that action.
The full version of Side Angle Pose is with the front knee bent 90 degrees, the knee is over the ankle and the front thigh is parallel to the floor. The upper side of the body should be a straight line from the outer edge of the back foot up to the tips of the fingers of the top hand.

Side view
But, you also have to look at the pose from the front. The body should be very 2 dimensional from the front. That means that the outer buttock of the front leg should be in line with the outer knee, which is in line with the outer heel. The buttocks should not be winging out.

In this view, I have the outer buttock of my front leg in line with the outer knee and my chest is facing sideways. This is skillful action
In this view, you can see that my buttocks are winging out and my chest is facing slightly downward rather than shining out to the side. This usually happens when a student prioritizes getting the hand to the floor over the form of the pose.

If I didn’t have the flexibility to get my hand to the floor, I would be better off placing my hand on a block, or my elbow on my knee if I didn’t have a block, and turning my chest open and then gradually, over time, I would be able to lower my hand to the floor.

A beautiful, modified pose.
One interesting way to do Side Angle Pose is lying down on the floor. The floor will serve as a guide as to align your shoulders, buttocks and hips in the same plane. If you take classes with me you will often hear me say that there are only 12 yoga poses and they are done in different relationships to gravity. When you are doing Side Angle while standing, gravity helps you bend deeply into your front leg. When you do it lying down on the floor, gravity will help turn your chest open. Doing poses lying down on the floor can also show you what you do and don’t know about where to place your body.

Can we learn to be skillful in practice? Can I find equanimity in backing off from grasping for the full pose until I develop the skill to enter the pose gracefully?
Forward Bending
You will often hear me give the cue that the back of the head should be in line with the upper back when folding forward so that you are not rounding your back. Do you know what you look like when you are forward bending? It is important to see yourself when you are folding forward. Often what you feel you are doing and what actually are doing can be two very different things. You can see yourself by looking in a mirror the next time you are practicing. Or, you can enlarge a thumbnail of yourself on the screen in your next zoom class.
When forward bending it is important to move from the hips. Unfortunately, if your hamstrings are tight, you might end up bending from the waist, and/or reaching from the shoulders. These positions are especially important when we hold forward bends for a long time as in the Immune System Sequence
Let’s take a look at what this can look like in Prasarita Padottanasana, or Wide-Legged Forward Bend.
In this first picture, I am hinging from the hips and, being fairly flexible, I can place my head on the floor with my back mostly straight, there is just some slight rounding at the end of the pose.

In this next picture, I am trying to be a student with tight hamstrings and I cannot fold forward very well. You can see that I can hinge at the hips to 90 degrees, but to go any further, I am rounding my back and reaching out of my shoulders to get my hands to the floor. I am using blocks to support my head, but the back of my head is lower than my upper back. which means that my chest is collapsed and I am reaching out of my shoulders to touch the floor. My experience in this pose is that I am pretty uncomfortable.

Here is the same posture using a chair instead. While the chair might be a more appropriate prop for me, how it’s being used is not conducive to folding forward; my back is still rounded with my head lower than my upper back and I am still reaching out of my shoulders.

Check out this last picture. I am still a student with tight hamstrings, but I am using the chair appropriately. My back is straight. I have a straight line from my hips to my elbows. There is no rounding of my back. The back of my head is in line with my upper back and I am not reaching out of the shoulders. In this position I am hinging at the hips. This position looks more like the first picture of myself in the full pose. It also feels very similar as opposed to the other two which don’t feel as good.

Practicing a forward bend, or any pose, in proper alignment will take you deeper into the pose over time. This version of the pose also shows me that the student understands what is meant to be happening in the pose. In other words, it’s not important to get your hands to the floor. It is important to hinge at the hips and to keep as much of Tadasana in your posture as possible.
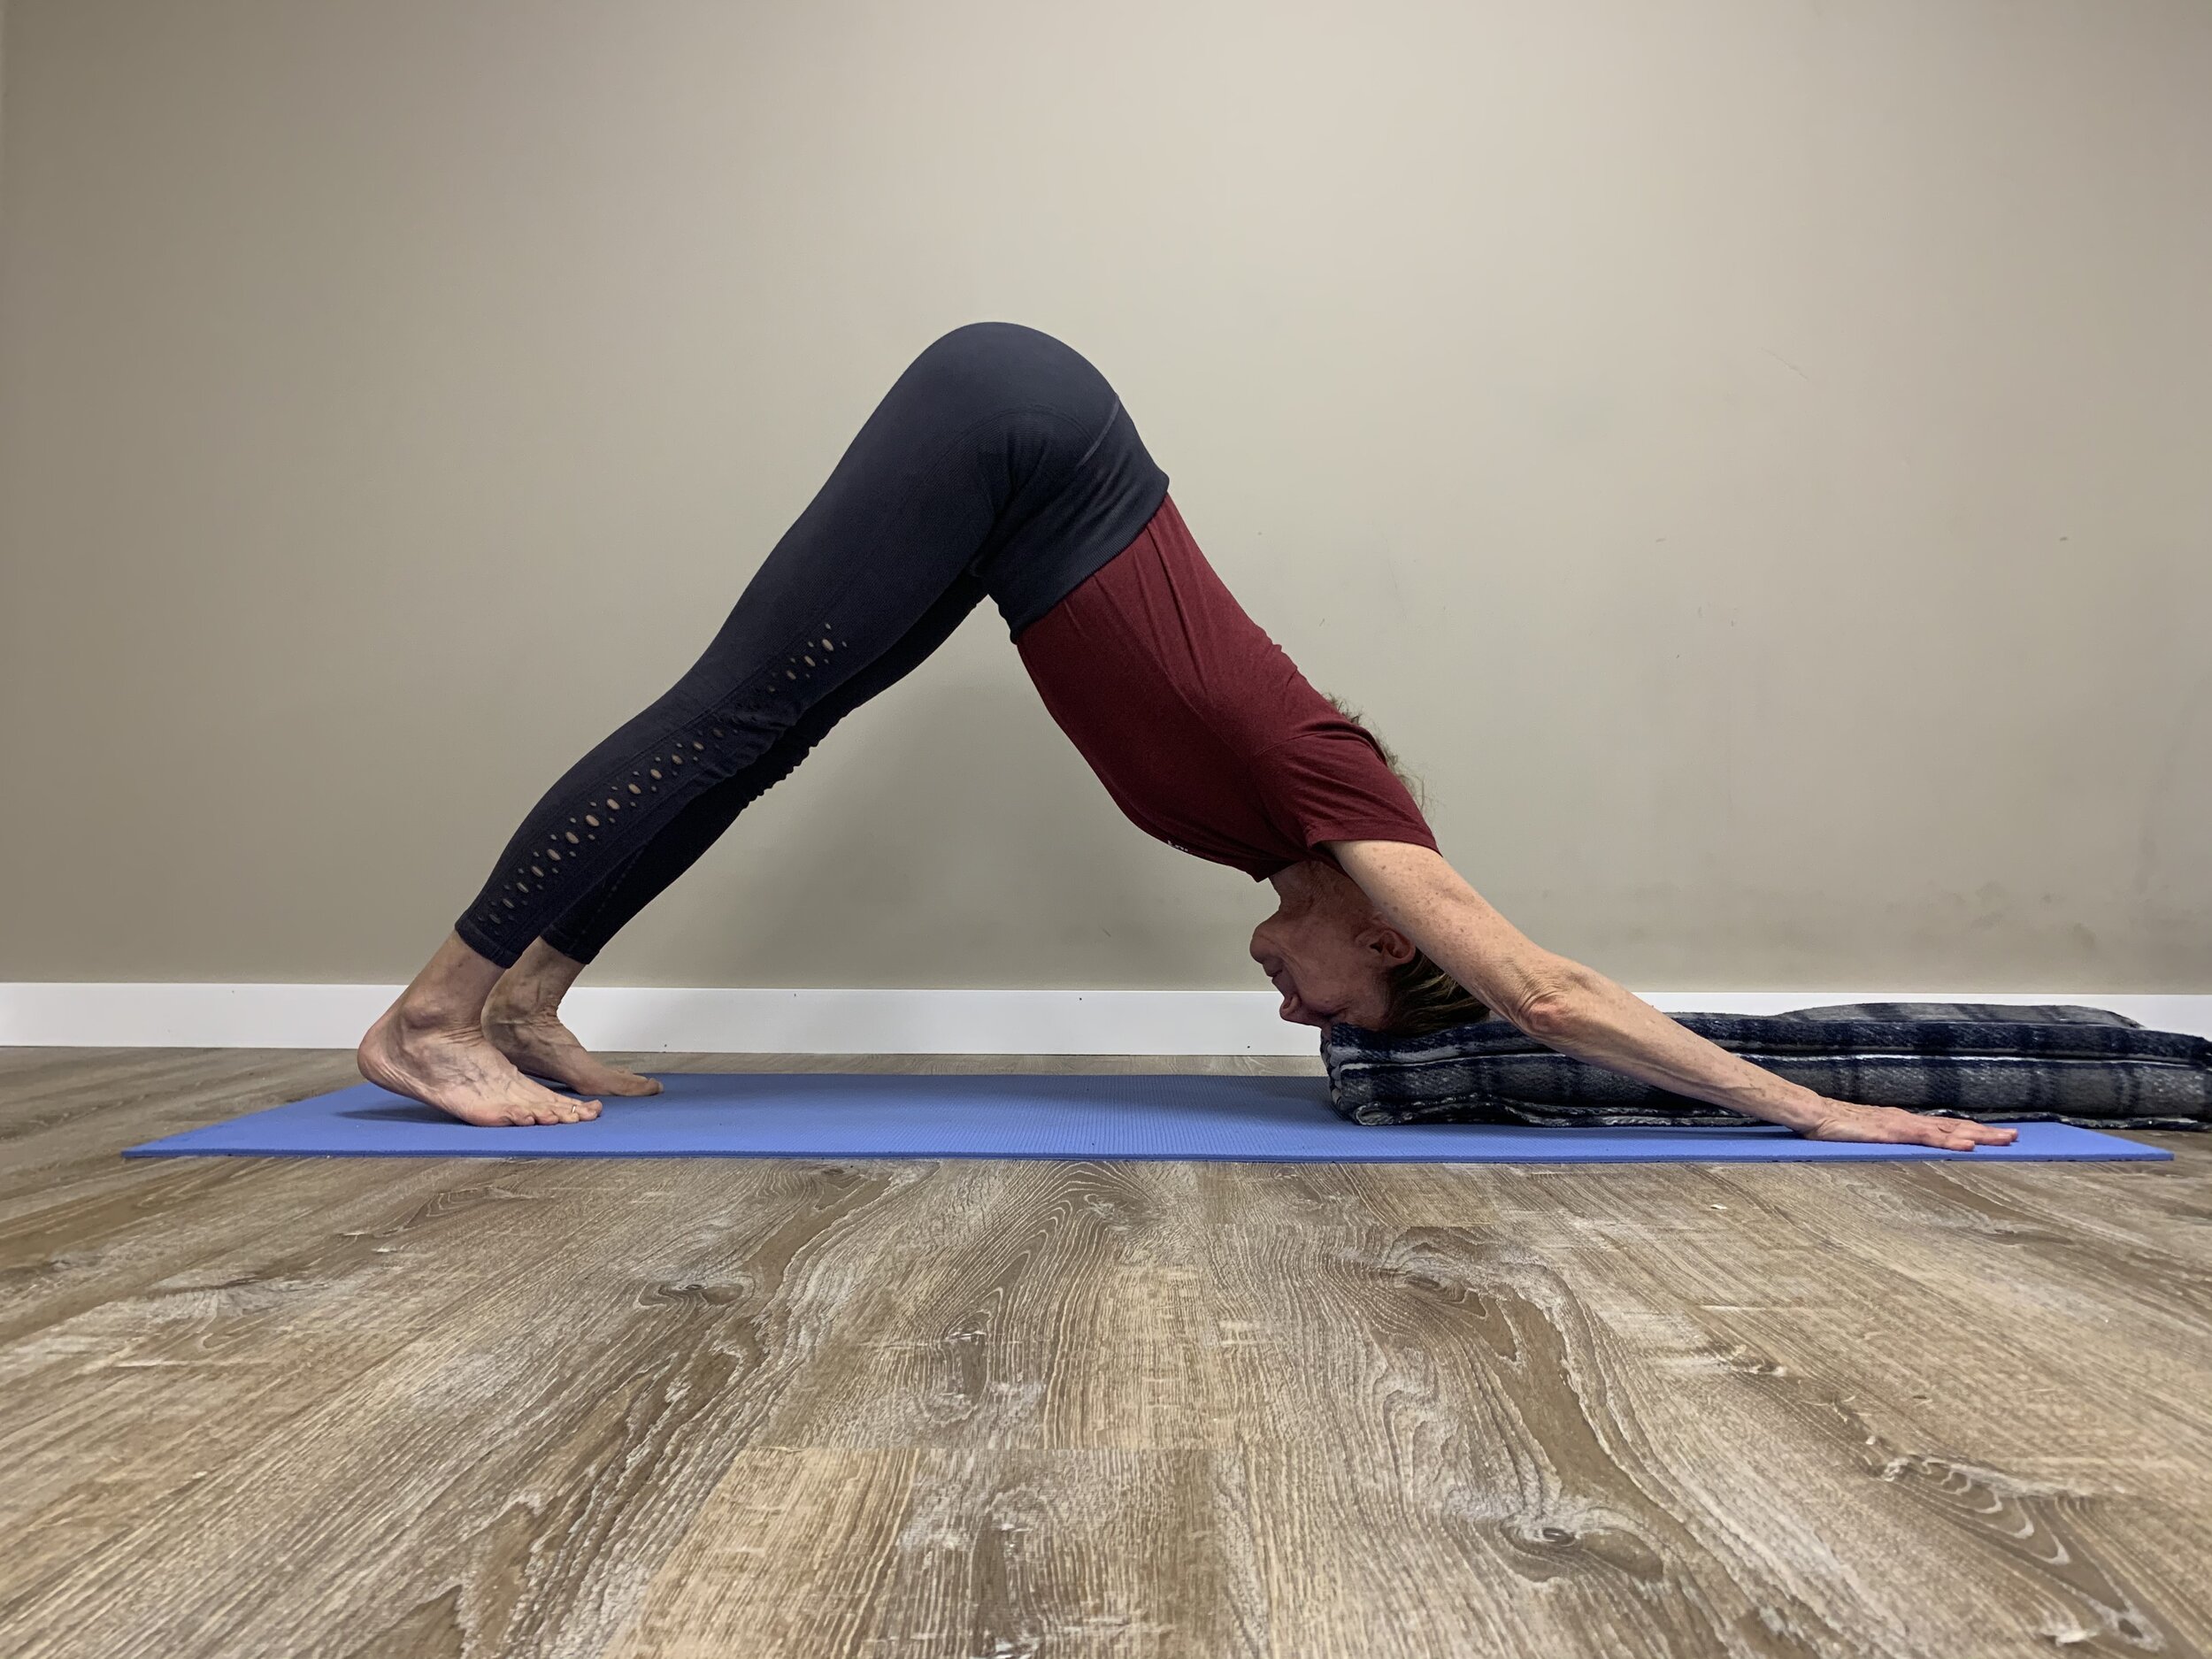
Adho Mukha Virasana or Child’s Pose
What’s up with Child’s Pose? What is the purpose of this posture? I think most Vinyasa instructors regard Child’s Pose as a resting posture. Something you collapse into when you are tired or can’t hold a posture any longer. Sometimes it is used as a generic default pose as in; if you can’t do X then just come into Child’s Pose.
I call this version of Child’s Pose a “pile of laundry” because most people come into this pose as if they have just taken off their clothes and dropped them into a pile on the floor. There is no action, other than complete surrender. There is no thought as to how the body is placed. There is no skill or intelligence in the pose. Yet, it is a yoga pose and one of the definitions of yoga is that it is “skill in action”. And as a yoga pose, it is an appropriate modification for some poses but not for any pose.
When I teach Child’s Pose, and I teach it, I don’t just say “come into Child’s Pose”. I teach the posture. Child’s Pose, or Adho Mukha Virasana (which translates to Downward Facing Hero) is both a warm up posture and a diagnostic pose. It is a precursor to Downward Facing Dog and to Handstand as well as other postures with the arms overhead such as Warrior I and for back bends such as Wheel.
Looking at someone in Child’s Pose can tell you a lot about the flexibility of their hips, knees, ankles and shoulders. Can they stretch the tops of their feet so that the fronts of their ankles touch the ground? Can they bend their knees enough so that they can sit on their heels? Can they fold at the hips enough so that their chest can come to the ground? (These are all blog posts for another time.) Can they extend their arms in a straight line from their hips through their shoulders to their wrists without their elbows winging out to the sides? Let’s look at this version of Child’s Pose.
In this first photo, I have come into Child’s Pose with my hands on the floor. As you can see, there is a straight line from my hips to my armpits, but from my armpits to my wrists the angle is different and the back of my head is below my upper back. This means that the front of my body is shorter than my back body. One of the main principles of yoga is that every pose has some element of Tadasana in it. In this case it is that the front body and back body are of equal length.

Child’s Pose as a pile of laundry
Child’s Pose with skillful alignment from hips to hands
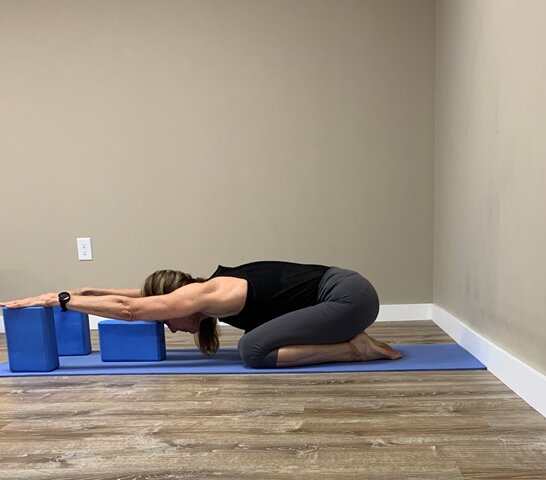
In this second photo, I have my hands and forehead on a block. This helps me to extend my sternum forward and spread my collarbones. Now I have a straight line from my hips to my hands and the front of my body is as long as the back of my body. See how the back of my head is on the same level as my upper back. This assures that the front of my body is as long as the back of my body.
The next time you come into Child’s Pose think about this. Doing Adho Mukha Virasana this way can help you prepare for Downward Facing Dog, Handstand, Warrior I, Tree and Back Bends. It can also help relieve pain in the neck and shoulders are it helps correct a forward head position.
My teacher always taught me to observe what was happening in your yoga poses. Every little thing we do has repercussions. Can we train ourselves to observe these differences? For example, what difference does it make where you place the strap on your foot in Hand to Big Toe Pose?
If you place the strap on your heel, the sensations will be transmitted through your heel down into the bones of your leg. See if you can feel this line of energy. Remember to keep your leg straight.

If you place the belt on the ball of your foot, the force will be transmitted into the muscles on the back of your leg; into the calf and hamstrings. This can be intense and if your hamstrings are sore, I would not do this version.

If you place the strap in the arch of your foot, you should feel the stretch balanced in the center of your leg. Try it here and see if you can feel that sensation of the whole leg working.
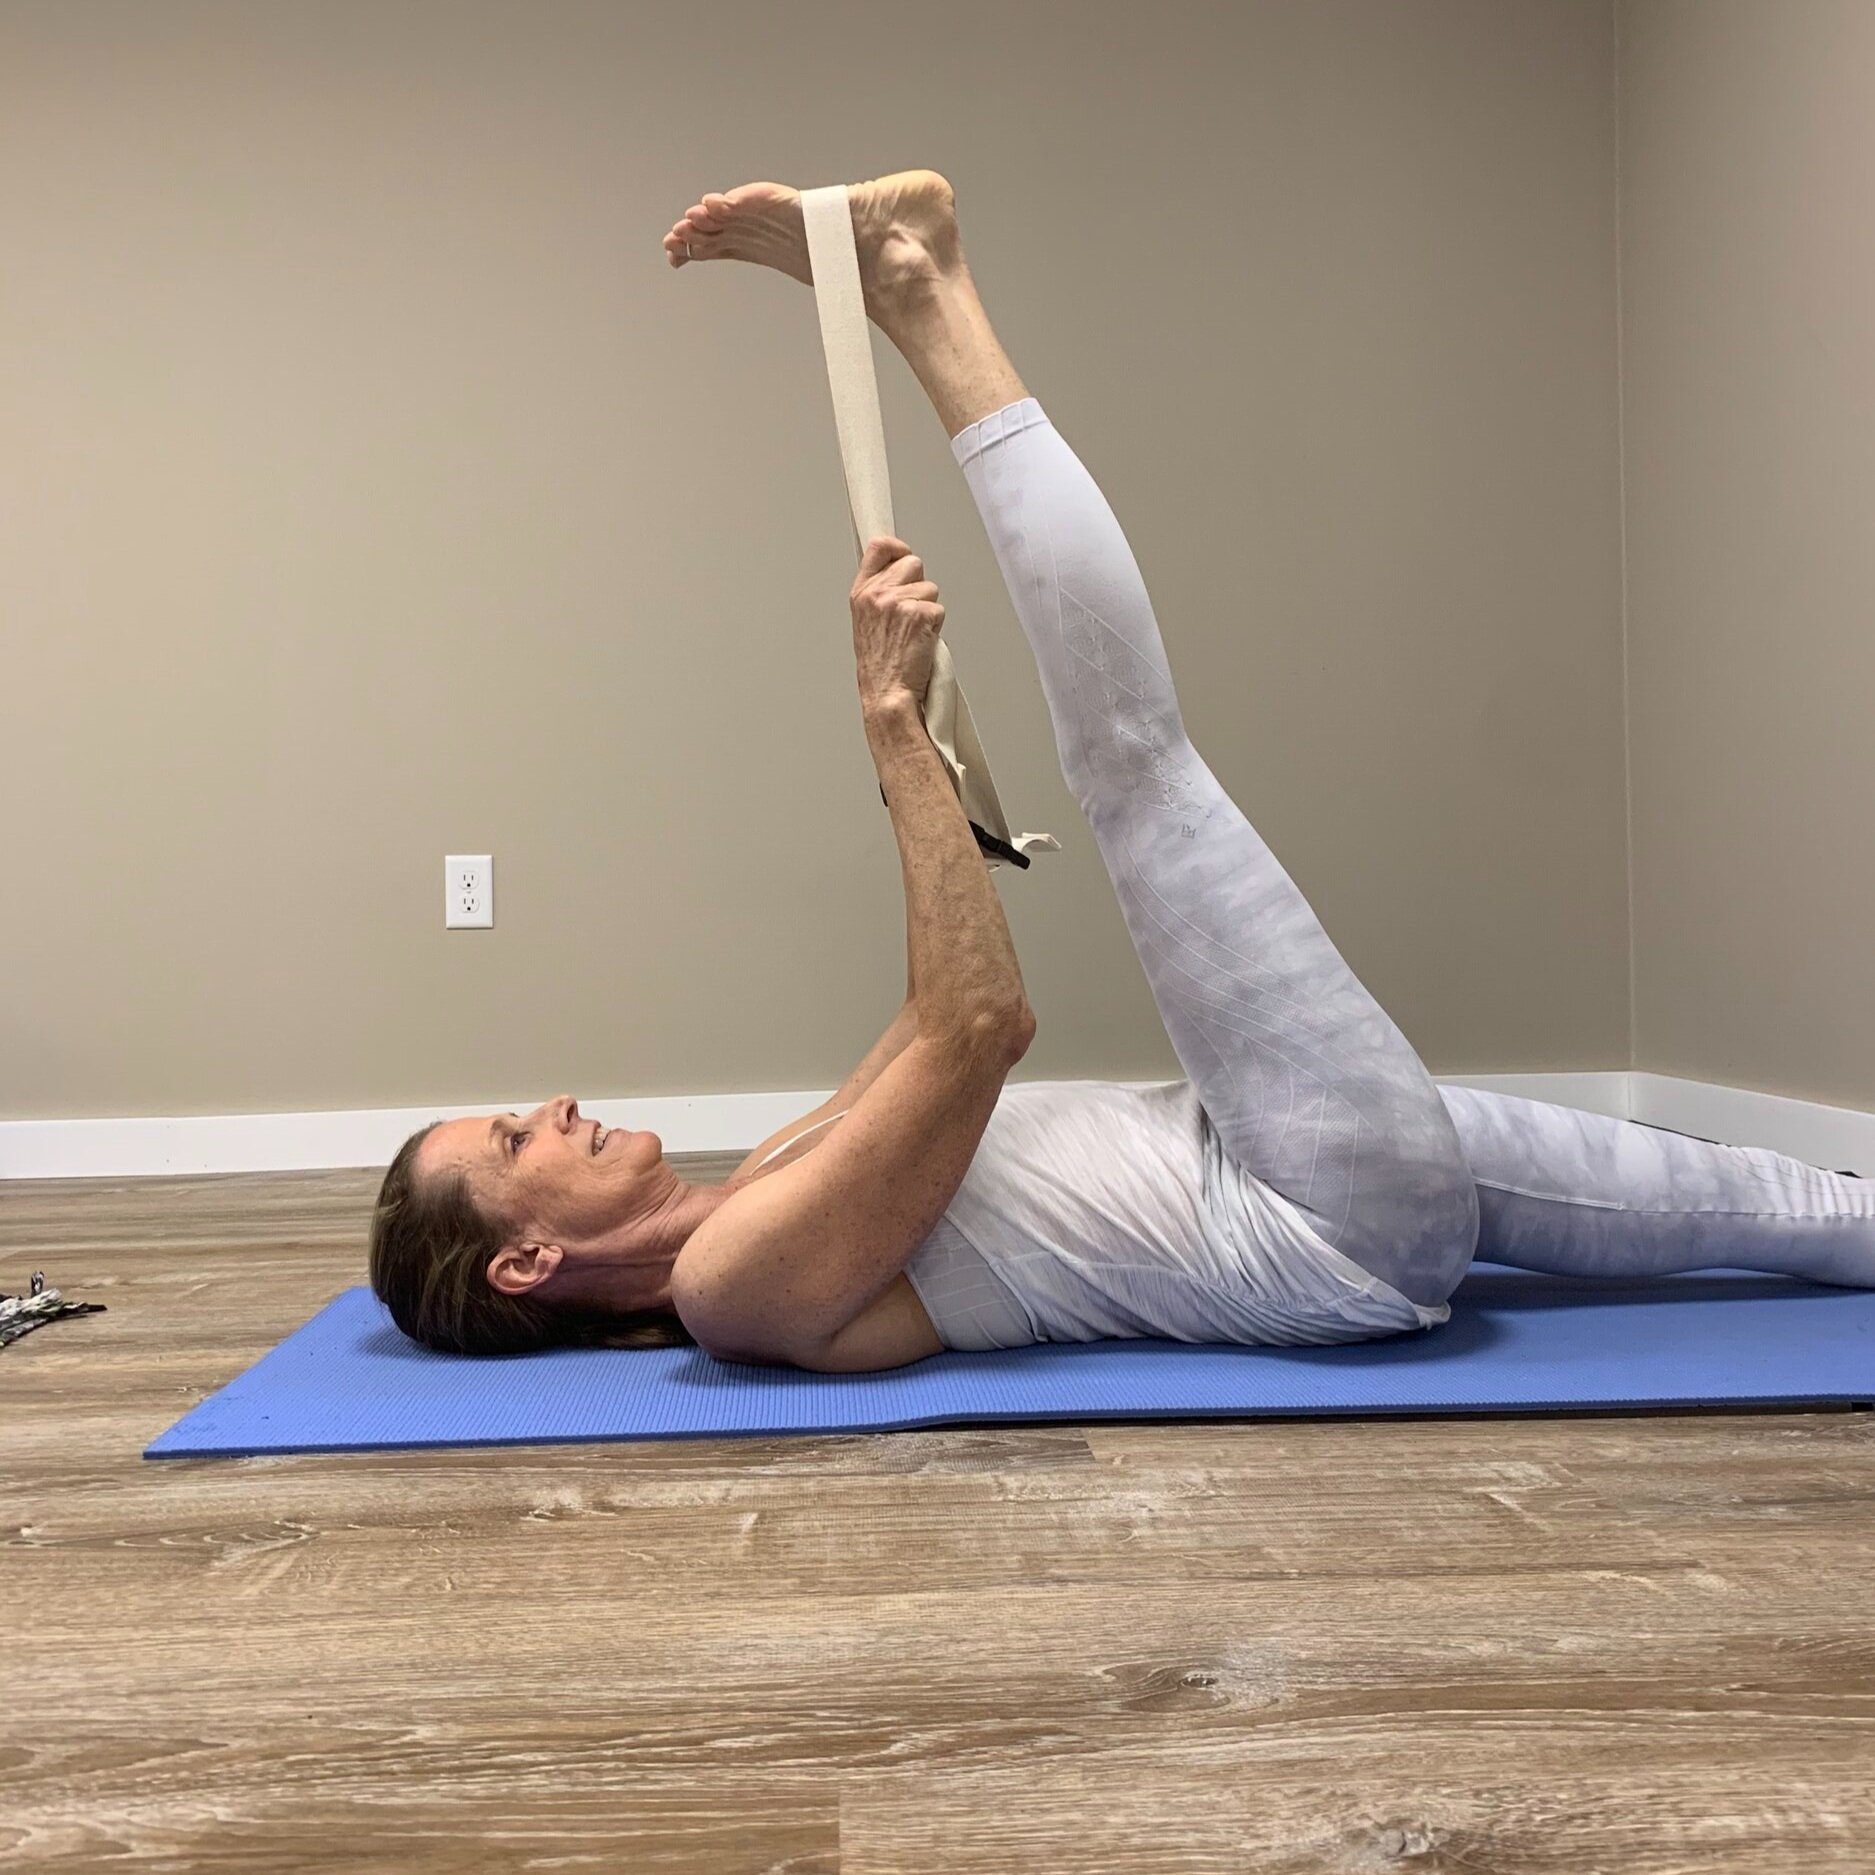
Yoga is about the development of consciousness. Can you develop your consciousness to detect the differences in where you place the belt on your foot? Once you start to learn to see and feel these differences, you will be entering into a deeper state of your yoga practice. As BKS Iyengar said: “Yoga does not just change the way we see things, it transforms the person who sees.