


If you just had a flu shot and I asked you how it went, what would you answer?

Private yoga sessions are a good way to get some very individualized attention and take your understanding and practice to the next level. You can often learn something in one private session that might take you years to muddle through on your own. (That has happened to me!) It’s an opportunity to ask questions about your particular body and your poses without worrying that you are the only one who doesn’t understand or get something.Privates are often prohibitively expensive and not sustainable for the average yoga student. However, have you ever thought about sharing the cost of a yoga private with a friend or a small group of friends?Semi-privates are often a great way to dive into your most burning questions in a safe and non-threatening venue. If you split the cost of a private among 4 people, the cost ends up being only a few dollars more than a regular yoga class.I have some space in my schedule to book a few extra privates during the summer:
Monday and Friday mornings at 7:30 or Thursdays at 11:30 at the Solebury Club.
Tuesdays at 11:30 or 2:30 at Cornerstone in Doylestown.
Fridays at 11:00 (at Cornerstone, New Hope)
If an evening time works better for you, please e-mail for times. I currently have Tuesday and Wednesday evenings available. At my house.
For rates and to book a private email me here: mkeisen@verizon.net
What’s Important? What’s not Important?
This past weekend I was a guest teacher in anatomy for a Yoga Teacher Training Program. Sunday’s class was about the shoulders. We were doing a Standing Forward Bend with the hands clasped behind the back in Yoga Mudra. There were a couple of students who had tight shoulders. Instead of clasping their hands behind their backs, I asked them to use a belt to get more width between their hands and more stretch in their shoulders. Some of these students with tight shoulders could not lift their hands off of their sacrums at all. Instead of stretching their shoulders, they were rounding their backs and caving in their chests.
Some of these teachers-to-be were astonished to see that I suggested that students with tight shoulders take their hands wider apart. One commented that she thought that the goal was to not only clasp the hands, but to press the palms together. Now it was my turn to be astonished. I could see that these teacher trainees were confusing what is important in a pose with what is not.
It is always important to keep the spine in mind and move in the big joints first. That means that we need to cultivate movement in the hips and shoulders. If the hips and shoulders don’t move, then the spine is put under a lot of pressure to move. Each vertebrae in the spine contributes only a few small degrees to the overall movement, but the hips and shoulders are capable of a great range of movement.
In the case of the hands in behind the back in Yoga Mudra, you have to look at the shoulders and upper back. If the shoulders are wrapped forward and the upper back is rounded, then there is no movement in the shoulders and the person will have trouble clasping their hands behind their back, let alone pressing the palms together.
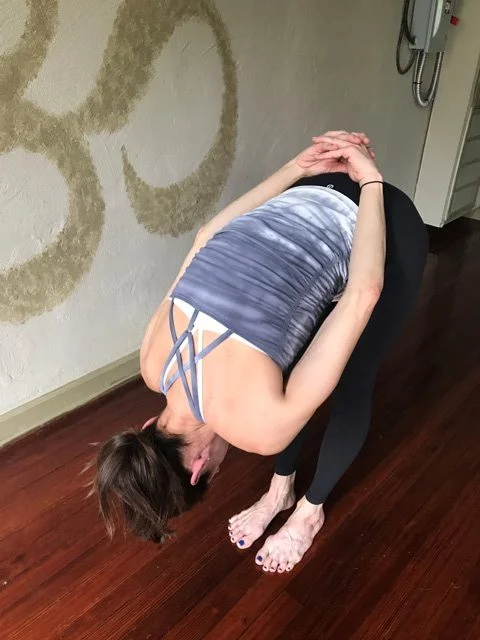
In that case, it would be better for the student to hold a belt between their hands and separate their hands until they can squeeze their shoulder blades together and lift their hands off of their back. What you look for is the ability to draw the spine into the body instead of it rounding outward. The idea here is that space creates freedom. With the hands apart, you create space.

Once the person can start to stretch the front of their shoulders and the spine is no longer rounded, then they can start to work their hands together.

Knowing how to use props correctly can support and inform your practice, or frustrate you if you don't know how to use them correctly. Blocks are pretty straightforward; you just have to know which height and which orientation. Blankets are a little harder and a lot like origami. It is important to fold the blankets correctly to provide a good platform to support your body. There are a couple of basic folds that we use in yoga, but that is the subject of another blog post. I always thought belts were pretty simple to thread, go up through the middle and down through the end. All you have to do is to make sure the buckle is right side up, otherwise the belt will slide. But I often find that teaching people how to use a belt in class takes up a lot more time than I often think it should.
I created this how to article after a colleague once commented that she used to think that all of the straps in the studio where she taught were broken. And this was a yoga teacher! Knowing how to use a prop is as important as knowing where to place your hands and feet in any pose.
In this post, I will go over how to thread the most common types of belts you usually find in a yoga studio. There are three basic types of belts; a metal buckle, a plastic buckle and a plastic quick release buckle. The metal buckles are the easiest to use. They can never be upside down.

A Metal Buckle
The metal buckle is made up of two metal D-rings. It threads the same way all belts thread; up through the middle hole and down through the hole on the end.
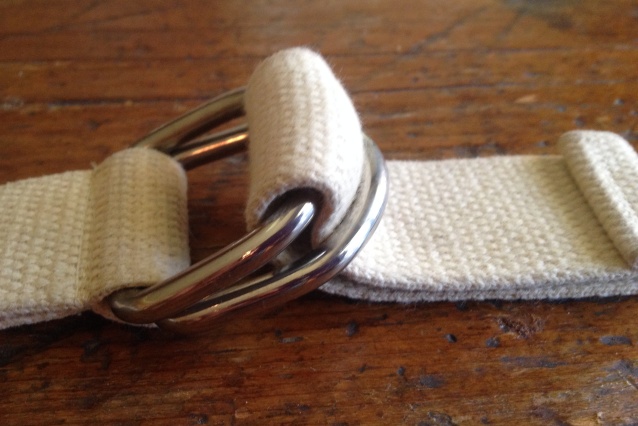
A metal buckle threaded
All buckles thread the same way, you go up through the middle and down through the outside.
The most important thing you need to know about a plastic buckle is whether it is right side up or upside down.
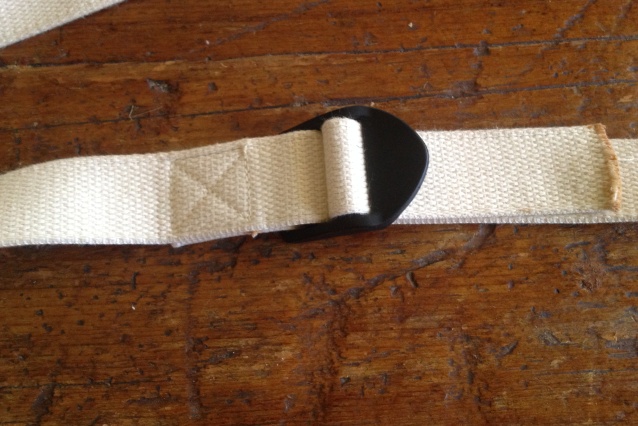
Here is a picture of a plastic buckle, right side up:

Here is a picture of the same buckle upside down:

This buckle is threaded the correct way and it will not slide.
If the buckle is threaded upside down, the belt will slide. This belt buckle is threaded the wrong way:

To thread a buckle, make sure the buckle is right side up and bring the tail end of the belt up through the middle:

And then take the belt down through the end.

The third kind of belt is the quick release belt. I like these the best because you don’t ever have to thread them, they usually have a spot where you pinch them to release them and then they snap together. The only thing you ever have to do to a quick release belt is to adjust the length of the belt.
Here is a picture of a quick release buckle:

Here is a picture of a quick release buckle taken apart:

This type of belt snaps together. To get it apart, you squeeze where the indentations are.
In the picture above left, the left side could be unthreaded but never needs to be. If you find a belt like this unthreaded, simply rethread it the way you would any other buckle; up through the middle and down through the end. It is often easier to thread it correctly when the two parts are snapped together.

To thread: First make sure the buckle is right side up and then go up through the middle hole…

…and down through the end.

This is a quick release belt threaded upside down. The belt won't hold. It will slide when you pull on it. Compare it to the picture of a the quick release belt above.
I hope that his article helps you figure out how to thread a belt correctly so that we can spend more class time on asana and less time on props!
Finding a yoga studio to practice in while on vacation is hit or miss, unless you have a recommendation from a friend. Every year when I visit my brother in Florida, I always look for a new studio/teacher. So far, I haven’t found one that I like. I know that I am a bit of a yoga snob, but there are certain things that can ruin the experience for me. Because I train people to become yoga teachers, these are skills that I think are essential for every new teacher to know. These are some of the basic elements I instruct my students in when I teach The Art & Craft of Teaching.

Intelligent sequencing: You should have a class plan and know when to follow it and when to change course. If your plan was to teach arm balances, but you have a room full of new students, it may be necessary to alter your plan. Make sure you properly warm your students up to do poses. This should go without saying. Doing advanced poses requires time and awakening of the various body parts to ensure safety and success. You should have an idea of benchmark or gateway poses for any of your peak poses. If students cannot do the gateway posture, then they certainly won’t be able to do the peak pose.
Enthusiasm: Even if you are a newer teacher, your enthusiasm will help your students get into the sequence you have chosen. As an advanced practitioner, I can work hard even on basic poses if the instructions are good. Encourage your students to be interested in the foundation and general form of the poses.
Self-study: Take pictures of yourself in poses or practice in front of a mirror. Sometimes the things we think we are doing, we are not. Develop and maintain a home practice. Teach from what you know and experience to be true. Don’t just parrot back the last class you took. Own the material you are teaching. Digging into a single pose on your mat could fuel a month’s worth of classes.
Mirroring: Unless you are showing something that is happening behind your back, don’t turn your back on your class. If you are doing the poses, face them. Mirroring is a skill that every yoga teacher should have. It isn’t hard to do, but it does take concentration and practice.
Teach the class, don’t lead it: Sure there are times when you can lead a practice, but most of the time, you should be teaching and learning about your students. Notice when you give an instruction, were they able to follow it? If not, why? You might not be able to do anything about it in that moment, but it can help you learn more about how to teach poses. You can certainly learn much more than if you are simply on your mat doing your own practice.
Put in the time: To become a really good yoga teacher you need to put in the time. Author Malcolm Gladwell says that it takes 10,000 hours to become an expert. But meanwhile, there are skills to practice that make the difference between being a mediocre yoga teacher and becoming a really good one. Strive for excellence!If these concepts intrigue you and you want to perfect your yoga teaching skills and up your game, e-mail me for more information. I am offering a mentorship program for a small number of yoga teachers in 2018.

No. Some people take teacher training as a way to learn more about yoga in general and their own practice in particular. However, there will be a portion of the program where you will need to step up and teach to your fellow classmates. It is often surprising to students how much they feel like they know their teacher’s script by heart but when it comes time to tell someone else how to come into Warrior II, they can’t find the words. One of the best ways to make sure that you know something inside and out is to have to explain it to someone else.
Teaching yoga, as I do, in a large group class in a studio or gym is not the only way to teach yoga. There are many ways to specialize in teaching yoga:
You can teach privates only.
There are opportunities to teach in the corporate world; lots of companies offer yoga as a perk to their staff.
Find your own special niche: pre-natal yoga, yoga for people in recovery, women who have been abused, kids, teens, seniors, retirement communities, teaching people in nursing homes, people who have MS.
However in order to branch out into any of these specialties you will need a basic 200 hour program under your belt, first.
OMG! Yes! I couldn’t touch my toes for the longest time when I first began teaching yoga. I thought I wasn’t good enough, or a “real” yoga teacher because of that.
But, what I saw as a detriment actually became a skill. If the yoga poses come easily to you, you might not understand why others can’t do the things you can do. I had to figure out how to touch my toes and that skill helped me explain to others what they needed to learn and do in order to become more flexible, too. I learned a lot about flexibility, both mental and physical, anatomy, alignment, the physiology of stretching plus patience and surrender, too. All of these lessons served to help me become a better teacher. I knew about the hard work and dedication necessary to achieve a pose. I also knew about the dangers of caring too much about achieving a pose and pushing too hard and getting injured in the process!
While there are some people who can do everything, most people seem to be better in one group of poses over another, and they have to work hard at those other poses to make progress and to stay balanced. If that is the way you are, then you will have to learn how to modify and use props and to be inventive as to how to get at the pose from another angle. You also learn lessons of patience, acceptance and surrender.
If you can’t do advanced poses, you probably won’t attract those students to you who want to do those poses, but this is a good thing. I recommend that new teachers: “teach only what you know”. As your practice and skills develop, you will be able to teach more poses.
An important thing to note is that most people may not be looking to be able to place their foot behind their head. It takes a lot of time and commitment to be able to do those kinds of poses. About a year ago, I took a survey of my yoga students asking them what they wanted out of their yoga practice. The top five responses had more to do with finding peace and serenity than they did with doing advanced poses.
When I first started training yoga teachers, I thought people should have at least three years of practice before embarking on a teacher training program. The more you know about yoga and the more adept your practice is, the more you will absorb from the training program. However, one of my friends and students said that she signed up for teacher training after only one yoga class. Now, she had been teaching other forms of fitness before. But, once she found yoga, she just fell in love with it. I like to encourage students to follow their passion.
Before the founding of Yoga Alliance and the 200 hour certification requirement, it used to be that you apprenticed with a teacher for at least ten years before you would start to teach. When that teacher felt that you knew enough to teach, they would encourage you to do so. People don’t want to wait that long these days. But one of the things that makes sense from that model is the idea of practicing for a long enough time to get past the honeymoon stage of the practice. If you practice for long enough something usually happens that creates a disturbance in your practice: an illness, injury or outside commitment. Sometimes circumstances make it difficult to get onto your mat. If there is a hiatus in practice, beginning again can be humbling. Going through that cycle is extremely educational.
The beginning of the Yoga Sutras starts with Atha Yoganusasanam, which means “Now Yoga”. This can be interpreted to mean that now is the right time to start yoga. If you are considering becoming a yoga teacher, only you know if it is plausible for you to move forward towards that dream. With more than 36 million yoga practitioners in the US, it seems that there should be plenty of yoga students to go around. You might have questions of time or finances, but age should not be a limiting factor.
I don’t think you can be too old or too young to begin to teach yoga. You will probably attract students who are close to you in age as your interests in the type of practice will be more similar. Younger students may be more fearless and want to have a faster paced, harder workout. Older students may appreciate a little more time to move into poses. They may be more cautious and have more physical limitations. As a more mature yoga teacher, age will give you experience, wisdom and sympathy for the diversity you may come across in a yoga class.
If this is something that you chronically struggle with, but it doesn’t keep you from living your life, then I don’t see why not. Honestly, though, only you can answer that question. If your injury or syndrome incapacitates you, then perhaps now is not the best time and you should wait until you are feeling better. However, I can tell you that your experience is common. A lot of yoga students and yoga teachers will suffer from these common ailments from time to time. Your experience can actually help students.
Look up Matthew Sanford. He is a yoga teacher who is paralyzed from the chest down. He has a book entitled Waking. It is a must read.
If you have any other questions, please feel free to contact me at mkeisen@verizon.net.
Meditation is a part of my Foundations program; it is how we begin each of the ten sessions. This year we will follow a mindfulness program. Mindfulness is the conscious act of observing your thoughts. It is said that we have somewhere between 12,000 and 60,000 thoughts a day and over 98% of those thoughts are exactly the same thoughts we have had on any previous day. Of those thoughts, 80% are negative! These thoughts take us into rehashing our past or rehearsing and worrying about our future. If we spend so much time in these thought patterns we are not being present for what is happening to us in the moment.
In the words of St. Augustine, “Men go forth to marvel at the heights of mountains and the huge waves of the sea, the broad flow of the rivers, the vastness of the ocean, the orbits of the stars and yet the neglect to marvel at themselves.”
Mindfulness is a powerful vehicle for greater understanding of how our minds work and the causes of suffering – those negative thoughts; and as such it can be an effective tool to end suffering. Being mindful of your own thinking is very important. It is said that intention is the crux of all actions and that our intentions shape our thoughts, words and deeds. If our intentions are wholesome, the results will be fruitful and skillful; if the intentions are unwholesome, the opposite will be true. This is how and why our minds, through our intentions and thoughts, are the creators of our own happiness and unhappiness.
Consider these statements:
Intention shapes our thoughts and words.
Thoughts and words mold our actions.
Thoughts, words and actions shape our behaviors.
Behaviors sculpt our bodily expressions.
Bodily expressions fashion our character.
Our character hardens into what we look like.
You may have heard the expression that by the time we turn fifty, we get the face we deserve. This is an interesting insight into how the mind affects the body.
By recognizing our habitual thinking patterns, mindfulness can help improve our sense of well being. It can often be difficult to sit in meditation and come face to face with our fears, shame, guilt and other negative thoughts. Mindfulness offers a space to step back and observe these thoughts without attaching to them. With time, we can learn to acknowledge difficult feelings and thoughts, see their origins more clearly, and experience deeper states of acceptance and peace.
Vietnamese monk Thich Nhat Hanh says, “Every mindful step we make and every mindful breath we take will establish peace in the present moment and prevent war in the future. If we transform our individual consciousness, we begin the process of changing the collective consciousness.” How can we ever expect to bring peace to the world if we don’t begin with ourselves?
Practice

Here is a simple mindfulness practice you can do. Pick some task you normally do on a daily basis, like brushing your teeth or washing the dishes, and try to keep your attention on the task as you do it, bringing all of your sense to the experience. If you are brushing your teeth, feel and listen to the bristles of the toothbrush against your teeth and gums, and smell and taste the toothpaste in your mouth. If you are washing the dishes, know that you are washing the dishes and take in the feel and the sound of the water, the smell of the soap. Notice any visual delights you might normally gloss over, such as the iridescence of the bubbles. Try it out and see what you notice. You can leave a comment in the section below.


