


There are some yoga practices you can do to help you sleep. These practices would be done sometime after dinner and before bed, maybe instead of crashing out in front of the TV.
Forward Bending
You will often hear me give the cue that the back of the head should be in line with the upper back when folding forward so that you are not rounding your back. Do you know what you look like when you are forward bending? It is important to see yourself when you are folding forward. Often what you feel you are doing and what actually are doing can be two very different things. You can see yourself by looking in a mirror the next time you are practicing. Or, you can enlarge a thumbnail of yourself on the screen in your next zoom class.
When forward bending it is important to move from the hips. Unfortunately, if your hamstrings are tight, you might end up bending from the waist, and/or reaching from the shoulders. These positions are especially important when we hold forward bends for a long time as in the Immune System Sequence
Let’s take a look at what this can look like in Prasarita Padottanasana, or Wide-Legged Forward Bend.
In this first picture, I am hinging from the hips and, being fairly flexible, I can place my head on the floor with my back mostly straight, there is just some slight rounding at the end of the pose.

In this next picture, I am trying to be a student with tight hamstrings and I cannot fold forward very well. You can see that I can hinge at the hips to 90 degrees, but to go any further, I am rounding my back and reaching out of my shoulders to get my hands to the floor. I am using blocks to support my head, but the back of my head is lower than my upper back. which means that my chest is collapsed and I am reaching out of my shoulders to touch the floor. My experience in this pose is that I am pretty uncomfortable.

Here is the same posture using a chair instead. While the chair might be a more appropriate prop for me, how it’s being used is not conducive to folding forward; my back is still rounded with my head lower than my upper back and I am still reaching out of my shoulders.

Check out this last picture. I am still a student with tight hamstrings, but I am using the chair appropriately. My back is straight. I have a straight line from my hips to my elbows. There is no rounding of my back. The back of my head is in line with my upper back and I am not reaching out of the shoulders. In this position I am hinging at the hips. This position looks more like the first picture of myself in the full pose. It also feels very similar as opposed to the other two which don’t feel as good.

Practicing a forward bend, or any pose, in proper alignment will take you deeper into the pose over time. This version of the pose also shows me that the student understands what is meant to be happening in the pose. In other words, it’s not important to get your hands to the floor. It is important to hinge at the hips and to keep as much of Tadasana in your posture as possible.
If you don’t like doing a full split because it just feels too intense, or you are too far away from the floor and you feel unstable and worried about tipping over and tearing something (a legitimate concern!) there are some modifications that can help you get there by reducing the discomfort of the full pose.
Parivrtta means revolved, turned round or back.
Parsva means side or flank.
Kona is an angle.

This is revolved side angle pose. It is a deep twisting posture that forms the foundation of many other twisting poses such as Parsva Bakasana, Side Crow and Eka Pada Koundinyasana I, a twisting arm balance. As we play with this pose this month, we will see where it leads us.
Parivrtta Parsva Konasana looks like Side Angle Pose with a twist, however, it is more related to Warrior I as the hips are facing the front leg, rather than turned open. It is a harder twist than Revolved Triangle Pose because of the position of the bent knee. The bent knee locks the hips in and restricts the twisting action in the lower back. In Revolved Triangle Pose, the twist is more evenly spread over the length of the spine. It is for this reason that Revolved Side Angle Pose can be therapeutic for the low back. But, it is also a caution to allow the spine to twist organically and not to try to force the twist. We will use other more open twists to prepare the body to come into Revolved Side Angle Pose.
The nature of twisting poses is that they change energy. If you are feeling stuck and lethargic, twists can help you get unstuck and energize you. On the other hand if you’re feeling wound up, twists can release energy and calm you down.
The thing about twists, however, is that when we run into difficulty in this pose we literally run into our self. Our own body gets in our way. How do we sit with the energy of that? What does it bring up for us? Does the judge or critic show up? Do we get mad or frustrated with ourselves? Do we try to use our arms for leverage and try to force ourselves into some external, or preconceived idea about ourselves? This is the interesting, inner work of the pose.
Pay attention to your breath while practicing Parivrtta Parsva Konasana. We generally use an exhalation to come into a twist and an inhalation to come out. Once you are in the pose notice your breath. It will be a little more restricted , but can you still breathe easily?
The time between Thanksgiving and New Year’s are so jam packed and busy, I often feel compelled to teach restorative poses just so people can have a few minutes of relaxation. That doesn’t mean that the entire class will be restorative, it just means that we might start or end with a restorative pose or two. In the middle, I plan on reviewing the poses that we went over this year. Here they are in the order in which we did them:
January – Sarvangasana or Shoulder Stand

Read about Shoulder Stand here.
February – Sirsasana I or Head Stand on forearms

Read about Head Stand here.
March – Navasana or Boat Pose

Read about Boat Pose here.
April – Bakasana or Crow

Read about Crow Pose here.
May – Svarga Dvijasana or Bird of Paradise

Read about Bird of Paradise here.
June – Hanumanasana or Split

Read about Split here.
July – Parivrtta Parsva Konasana or Revolved Side Angle Pose
Read about Revolved Side Angle Pose here.
August- Visvamitrasana or Side Plank with lower leg lifted

Read about Visvamitrasana here.
September – Urdhva Dhanurasana or Wheel

Read about Wheel here.
October – Prasarita Padottanasana to Sirsasana II or Wide Leg Forward Fold to Tripod Head Stand


Read about the transition from Wide Legged Forward Fold to Headstand here.
November – Astavakrasana or Eight Crooked Places Pose
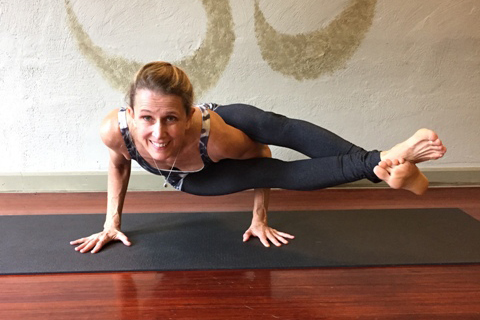
Read about Astavakrasana here.
December – I hope you enjoy this year in review! Also, if you have any requests for poses that you would like to work on next year, let me know in the comments below.
Continuing with postures in the sequence for Astavakrasana, let’s look at Lizard Lunge.
In order to be able to do Astavakrasana you have to be able to get your knee onto the back of your arm when you are in a seated position. In Lizard Lunge, you can see whether or not your shoulder is below your knee.
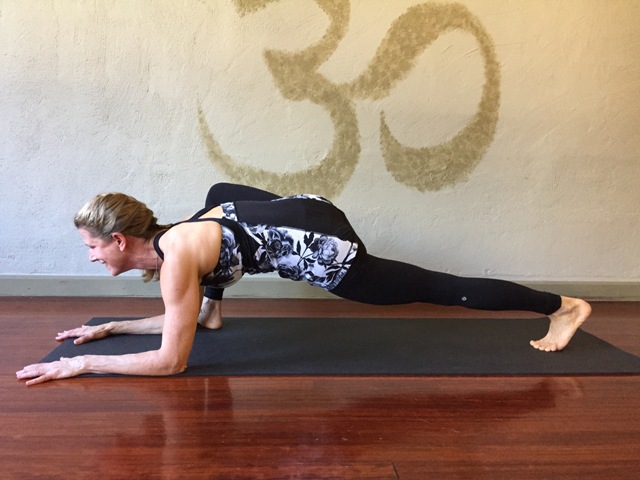
In this pose, the back leg is straight and the front leg bent with the shin perpendicular to the floor. If you can easily get both forearms evenly on the ground, then chances are that you have the flexibility to do Astavakrasana.
In the beginning you start with your hands on the floor,

eventually lowering your elbows to blocks and finally to the floor. It is harder to lower the inside elbow to the floor.
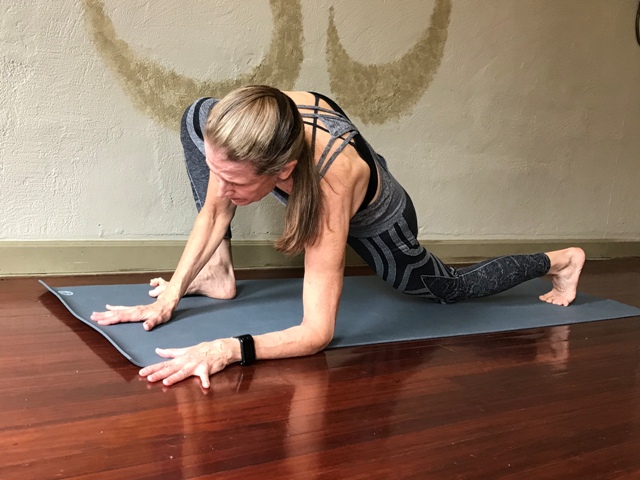
It is important to lower them both evenly. You may have to back up until you are able to achieve this. This may take a while. If you are interested in doing Astavakrasana, you might want to practice Lizard Lunge every day until you can easily get your elbows to the floor. This practice could unlock other poses for you as well such as Warrior I, Pigeon and Split.
In some of these photos, you can see that my back knee is on the floor. In the beginning, you might need to bend your back leg. Eventually, you may be able to keep the knee lifted and the back leg straight.
It is also important to maintain the length on the front body. Your torso will round if you are reaching too hard to get the elbows to the floor. Keep pressing down into the hands or forearms and lengthen your collar bones forward. Draw your shoulder blades towards each other and down your back towards your waist rather than away from each other and down towards the floor. As you would in Caturanga, don’t drop your head. Keep your neck in line with the spine and the back of your head level with your upper back.
You may be tempted to let the front ankle roll out. Some call this “Broken Pigeon”.

This often happens in the desire to get the elbows to the floor. This could be a good variation when you are working towards poses with the legs externally rotated such as Pigeon or Seated Cobbler’s Pose. But for now we are working on our ability to fold forward with one knee bent into our chest as in Marichyasana I.

For this pose, I prefer keeping the weight pressing down onto the inner edge of the foot and keeping the ankle straight. If you need some play, it is better to let the knee and foot rotate out a few degrees, but I would only do this if I could not get my hands to the floor, not to get my elbows to the floor. Be patient. Don’t force the stretch.

The next step would be to come into Eka Hasta Bhujasana, or One Arm Leg Pressure Pose.

And from there into Astavakrasana

Continuing with postures in the sequence for Astavakrasana, let’s look at Lizard Lunge.In order to be able to do Astavakrasana you have to be able to get your knee onto the back of your arm when you are in a seated position. In Lizard Lunge, you can see whether or not your shoulder is below your knee. In this pose, the back leg is straight and the front leg bent with the shin perpendicular to the floor. If you can easily get both forearms evenly on the ground, then chances are that you have the flexibility to do Astavakrasana.In the beginning you start with your hands on the floor, eventually lowering your elbows to blocks and finally to the floor. It is harder to lower the inside elbow to the floor. It is important to lower them both evenly. You may have to back up until you are able to achieve this. This may take a while. If you are interested in doing Astavakrasana, you might want to practice Lizard Lunge every day until you can easily get your elbows to the floor. This practice could unlock other poses for you as well such as Warrior I, Pigeon and Split. In some of these photos, you can see that my back knee is on the floor. In the beginning, you might need to bend your back leg. Eventually, you may be able to keep the knee lifted and the back leg straight. It is also important to maintain the length on the front body. Your torso will round if you are reaching too hard to get the elbows to the floor. Keep pressing down into the hands or forearms and lengthen your collar bones forward. Draw your shoulder blades towards each other and down your back towards your waist rather than away from each other and down towards the floor. As you would in Caturanga, don’t drop your head. Keep your neck in line with the spine and the back of your head level with your upper back.You may be tempted to let the front ankle roll out. Some call this “Broken Pigeon”.This often happens in the desire to get the elbows to the floor. This could be a good variation when you are working towards poses with the legs externally rotated such as Pigeon or Seated Cobbler’s Pose. But for now we are working on our ability to fold forward with one knee bent into our chest as in Marichyasana I.For this pose, I prefer keeping the weight pressing down onto the inner edge of the foot and keeping the ankle straight. If you need some play, it is better to let the knee and foot rotate out a few degrees, but I would only do this if I could not get my hands to the floor, not to get my elbows to the floor. Be patient. Don’t force the stretch.The next step would be to come into Eka Hasta Bhujasana, or One Arm Leg Pressure Pose. And from there into Astavakrasana


