
Anjaneya is the name of the mother of Hanuman, the monkey god, who is famous for his giant leap from the southern tip of India to the Himalayas. He performed this incredible feat to save Lakshmana,
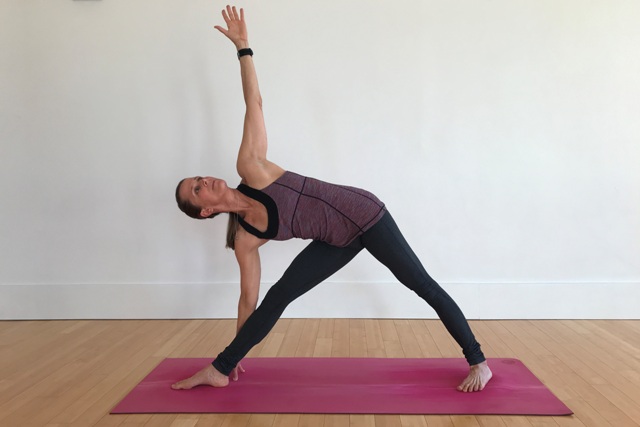
Revolved Side Angle Pose as a prep for Astavakrasana
Revolved Side Angle
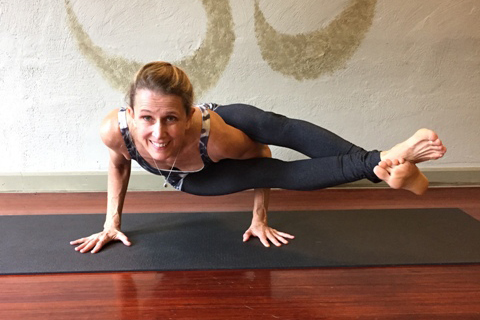
In order to do this arm balance you need the flexibility to bend your front leg to 90 degrees in Warrior I, get your hand to the floor inside of your front leg in Side Angle Pose, have the strength to do Caturanga and have the rotational flexibility to do a twist. I have talked about the other aspects of this pose in previous blog posts. This week, I’ll talk about twisting.

Let’s look at Revolved Side Angle as a prep pose for Astavakrasana. In Revolved Side Angle Pose, just as in Side Angle Pose, it is important to bend the front leg to 90 degrees. It is much easier to twist and get your elbow or arm to the opposite knee when the front leg is deeply bent. Notice, how in the picture, I have worked to get my bottom arm to the outside of the front leg
Because, Revolved Side Angle Pose is more related to Warrior I than it is to Side Angle Pose, we’ll start with Warrior I as the base. This has to do with the fact that the hips are square to the front in Revolved Side Angle Pose and Warrior I rather than to the side as they are in Side Angle Pose.

For stability, let’s start with the back knee on the ground. In this position it is easier to get the front leg bent to 90 degrees with the front thigh parallel to the floor. Remember that a twist is defined as a movement between the hips and shoulders where one of those body parts stays stationary and the other part turns. In this pose it’s the hips that are remaining stationary and the shoulders are turning.

From a low lunge position with your right leg forward, place your thumb into the hip crease of the forward leg to remind that hip to stay back and square as you rotate your torso. On an inhalation, lift the left arm up into the air lengthening the left side of your body and on an exhalation, rotate your torso to the right brining the left elbow to the outside of the right knee. Reach across your belly and grab your left ribs and encourage them to turn more to the right bringing your left ribs over your right thigh and trying to get your left armpit to your right knee. Now, lengthen your spine so that the front of the body is as long as the back body, moving your right shoulder as far away from your right hip as possible. Bring the hands in prayer in front of your heart with your left elbow or armpit outside of your right knee. Every time you inhale create more length on the front body and every time you exhale explore your ability to rotate a little more.
Notice where your prayer hands are and lift the torso to bring the heart to the hands rather than allowing the hands to push to your right shoulder.
Stay for a few breaths with calm breathing and then try the pose to the other side. If your balance is good and you are ready, try coming into the pose a second time with your back knee lifted off of the floor in Crescent Warrior. You can always do this version of the pose with your back heel against the wall for stability.
The rotation you develop in Revolved Side Angle Pose will help you with the rotation you need for Astavakrasana.
Bound Side Angle Pose as a preparation for Astavakrasana
Bound Side Angle
Last week I talked about how Lizard Lunge was a prep for Astavakrasana. And it is. I am using this pose as a benchmark pose; meaning that it can tell you where you are and what you have to work on to get to the desired final pose. In Astavakrasana, you need the flexibility of getting one knee up and over your shoulder. You can see how close you are to doing that in Lizard Lunge. Can you get your elbows to the floor? If you can, then your knee is higher than your shoulder. If you can’t, don’t worry and don’t try to force it. Be patient and keep working on your Lizard.
Bound Side Angle is also one of those poses where you need your shoulder to be lower than your knee in order to be able to bind. But that is not the first thing you have to look at. The primary action is your ability to bend your front leg to 90 degrees. Before we look at Bound Side Angle Pose, let’s back up and look at the pieces that make up Bound Side Angle Pose. Those pieces are: Warrior II, Triangle, Side Angle and the hands in prayer behind the back (Pascima Namaskar).
Let’s start in Warrior II. Can you bend your front knee so that the thigh is parallel to the floor? Take an honest look at yourself in a mirror. Is your front thigh parallel to the floor with your shin perpendicular? If you can’t bend that deep (and keep your knee over your ankle), don’t try to force it. Try putting a block, or two, under your front foot and see if that helps you. You may have to play with that for a while, but eventually you can try it without the block.
The second standing pose is Triangle. Eventually we are looking to be able to get the spine horizontal and the bottom hand on the floor. Again, be patient. Your bottom hand may need to rest on your leg or a block. Watch your progress with the help of a mirror. Look at your spine. Keep it straight as you stretch towards the floor; don’t let it dome up in the middle. Also, look to see that your torso is directly above the front leg, not in front of it.
Now it’s time to put Warrior II and Triangle together in Side Angle Pose. Can you bend your front knee so that the thigh is horizontal and get your lower hand to the floor with the upper edge of your body from your back foot to your top hand in one straight line? If you can, you are in full Side Angle Pose and you are ready to bind. If you can’t, keep working on Warrior II and Triangle poses.

There is some separate arm work to do to prepare the shoulders for binding and that is getting your hands behind your back in prayer. Let's start by looking at your ability to clasp your hands behind your back in Yoga Mudra.

This arm position stretches the front of the shoulders and is the same arm position you need for Bridge Pose and Shoulder Stand.

In Yoga Mudra we work the hands behind the back with the arms straight and then we can bend one elbow at a time and work the arms in Cow Face Posture (Gomukhasana).

If you cannot clasp your hands behind your back in Cow Face Posture, use a belt.

Once you can clasp your hands in Gomukhasana then begin working both hands behind your back in Reverse Prayer. If you can do that, you have all the necessary shoulder flexibility to bind in Bound Side Angle Pose.

To come into Bound Side Angle Pose first come into Side Angle Pose but place your bottom hand on the floor inside your front leg. Raise your top arm straight up in the air, and if you need a belt to bind, then the belt should be in this top hand. Bend your top arm back behind your waist as you dip your front shoulder below your front thigh. Slide your bottom forearm under your front thigh and grab hold of your other hand or the belt. Then bring your front buttock under you as you lean your upper body back against your bent leg. This brings your body back into Side Angle position. with your hands now clasped behind your back.

Getting your hands around your front thigh in Bound Side Angle Pose is a very similar action to getting your leg up over your shoulder for Astavakrasana. You can always use a belt for Side Angle Pose until the day you can finally clasp and then you know that Astavakrasana is more attainable. Keep working. I'll see you in class!
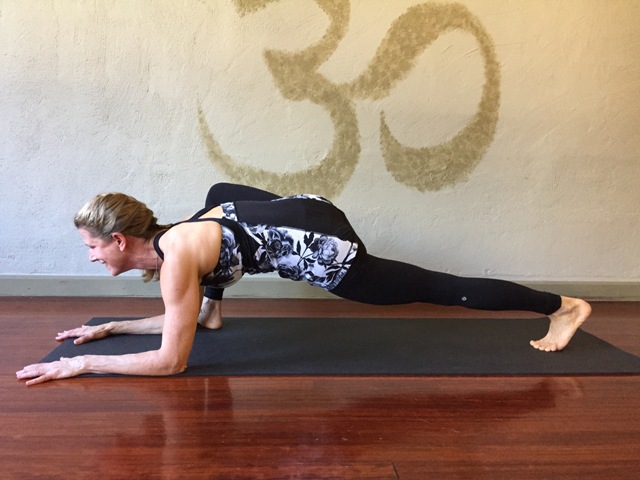
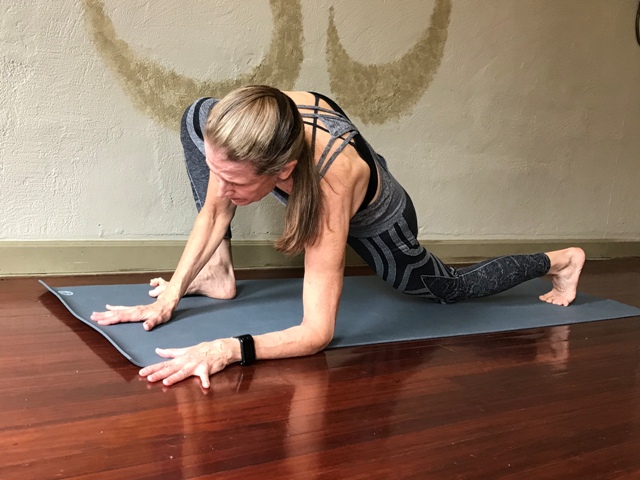
Lizard Lunge as a preparation for Astavakrasana
Continuing with postures in the sequence for Astavakrasana, let’s look at Lizard Lunge.
In order to be able to do Astavakrasana you have to be able to get your knee onto the back of your arm when you are in a seated position. In Lizard Lunge, you can see whether or not your shoulder is below your knee.
In this pose, the back leg is straight and the front leg bent with the shin perpendicular to the floor. If you can easily get both forearms evenly on the ground, then chances are that you have the flexibility to do Astavakrasana.
In the beginning you start with your hands on the floor,

eventually lowering your elbows to blocks and finally to the floor. It is harder to lower the inside elbow to the floor.
It is important to lower them both evenly. You may have to back up until you are able to achieve this. This may take a while. If you are interested in doing Astavakrasana, you might want to practice Lizard Lunge every day until you can easily get your elbows to the floor. This practice could unlock other poses for you as well such as Warrior I, Pigeon and Split.
In some of these photos, you can see that my back knee is on the floor. In the beginning, you might need to bend your back leg. Eventually, you may be able to keep the knee lifted and the back leg straight.
It is also important to maintain the length on the front body. Your torso will round if you are reaching too hard to get the elbows to the floor. Keep pressing down into the hands or forearms and lengthen your collar bones forward. Draw your shoulder blades towards each other and down your back towards your waist rather than away from each other and down towards the floor. As you would in Caturanga, don’t drop your head. Keep your neck in line with the spine and the back of your head level with your upper back.
You may be tempted to let the front ankle roll out. Some call this “Broken Pigeon”.

This often happens in the desire to get the elbows to the floor. This could be a good variation when you are working towards poses with the legs externally rotated such as Pigeon or Seated Cobbler’s Pose. But for now we are working on our ability to fold forward with one knee bent into our chest as in Marichyasana I.

For this pose, I prefer keeping the weight pressing down onto the inner edge of the foot and keeping the ankle straight. If you need some play, it is better to let the knee and foot rotate out a few degrees, but I would only do this if I could not get my hands to the floor, not to get my elbows to the floor. Be patient. Don’t force the stretch.

The next step would be to come into Eka Hasta Bhujasana, or One Arm Leg Pressure Pose.

And from there into Astavakrasana

Continuing with postures in the sequence for Astavakrasana, let’s look at Lizard Lunge.In order to be able to do Astavakrasana you have to be able to get your knee onto the back of your arm when you are in a seated position. In Lizard Lunge, you can see whether or not your shoulder is below your knee. In this pose, the back leg is straight and the front leg bent with the shin perpendicular to the floor. If you can easily get both forearms evenly on the ground, then chances are that you have the flexibility to do Astavakrasana.In the beginning you start with your hands on the floor, eventually lowering your elbows to blocks and finally to the floor. It is harder to lower the inside elbow to the floor. It is important to lower them both evenly. You may have to back up until you are able to achieve this. This may take a while. If you are interested in doing Astavakrasana, you might want to practice Lizard Lunge every day until you can easily get your elbows to the floor. This practice could unlock other poses for you as well such as Warrior I, Pigeon and Split. In some of these photos, you can see that my back knee is on the floor. In the beginning, you might need to bend your back leg. Eventually, you may be able to keep the knee lifted and the back leg straight. It is also important to maintain the length on the front body. Your torso will round if you are reaching too hard to get the elbows to the floor. Keep pressing down into the hands or forearms and lengthen your collar bones forward. Draw your shoulder blades towards each other and down your back towards your waist rather than away from each other and down towards the floor. As you would in Caturanga, don’t drop your head. Keep your neck in line with the spine and the back of your head level with your upper back.You may be tempted to let the front ankle roll out. Some call this “Broken Pigeon”.This often happens in the desire to get the elbows to the floor. This could be a good variation when you are working towards poses with the legs externally rotated such as Pigeon or Seated Cobbler’s Pose. But for now we are working on our ability to fold forward with one knee bent into our chest as in Marichyasana I.For this pose, I prefer keeping the weight pressing down onto the inner edge of the foot and keeping the ankle straight. If you need some play, it is better to let the knee and foot rotate out a few degrees, but I would only do this if I could not get my hands to the floor, not to get my elbows to the floor. Be patient. Don’t force the stretch.The next step would be to come into Eka Hasta Bhujasana, or One Arm Leg Pressure Pose. And from there into Astavakrasana
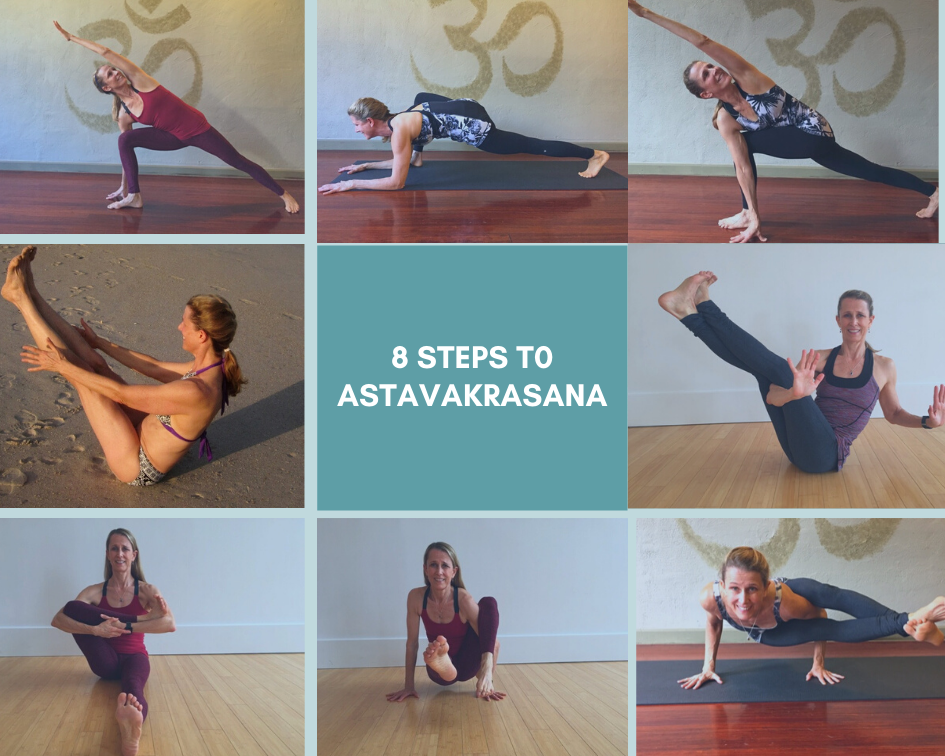
A Sequence to Prepare for Astavakrasana
Preparing for Astavakrasana
Here is a sequence you can work on to prepare for Astavakrasana:Start by doing a few of your favorite Sun Salutes to warm up. Then try these poses in the following order:
Side Angle Pose. Work to get your bottom hand to the floor.
Lizard Lunge. Work to get your forearms to the floor with your shoulders lower than your knee. Notice the back of my head is not lower than my upper back!
Revolved Side Angle Pose. Work on getting your armpit outside of the opposite knee with your hand on the floor. This may take some time to achieve.
Boat Pose to build core strength for the arm balance.
"Revolved Boat" or Seated Astavakrasana. This gives you something to work on if you cannot do the arm balance. Understanding how your arm fits through your crossed legs and how you straighten your legs against your arm will help for the final pose.
Seated Baby Cradle to loosen the hip.
One Arm Leg Pressure pose. Work to get your knee up as high towards your shoulder as you can. With your knee clamped down against your arm, you press into your hands, draw your navel to your spine and lift yourself off of the floor. Once you are lifted, you cross your straight leg ankle over your bent leg ankle to squeeze your legs onto your arm. Then bend your elbows and tip forward like you are doing Caturanga and while pressing your top leg onto the back of your tricep as you squeeze your legs together and Voila, You are in the final posture! Or not. This may take some time.
Astavakrasana
Be patient with yourself as you work on these poses. Understand the stage of each pose that you are in and work on your practice over time. Progress can be imperceptible from one day to the next, but over time, the results can be pretty impressive. Don't give up!
A Sequence for Back Bending Over a Chair
I learned how to do wheel by bending backwards over achair. The first time I tried it, Ithought it was some sort of Medieval torture. But I soon discovered that working with the chair became more and morecomfortable and my Urdhva Dhanurasana, or Wheel, became better and better.

My feet should be against a wall so that I learn to press through my legs. (I didn't use a wall in order to frame a nicer picture for you.)
Yoga axiom #1 Props are not remedial tools, they are teachers.
Yoga axiom #2 Support equals release. This is true in yoga postures and in life. By learning how to prop myself in good alignment, my body learned how to be in the shape of Urdhva Dhanurasana and I got closer and closer to being able to do the pose without the props.
Yoga axiom #3 Practice doesn’t make you perfect, it only makes you a practitioner; perfect practice makes perfect.
If you habitually push yourself up into Wheel with your elbowswider than your wrists and your knees, ankles and hips externally rotating, notonly do you risk injuring yourself, but then you have to unlearn these badhabits.
Here is a sequence to help you practice back bending over achair to open your upper back and prepare your body for Urdhva Dhanurasana.
Warm Ups: Cat/Cow Do a couple of these warm up stretches being mindful of how your breath moves, your back arches and flexes and how the hips and shoulders move.
Sun Salutes: Do 3 Surya Namaskar A. Pause for a few breaths in each Bhujangasana (Cobra) in order to feel the evenness of your back as it arches. Can you keep the inner thighs lifting as you press down into the tops of the feet and keep the quadriceps engaged? Can you pull backwards with your hands as you expand your collar bones and lift your chest? From the roof of your mouth press the back of the head back and look up!
Standing Pose: Virabhadrasana I with your back heel against the wall. Hold for a few breaths as you contemplate your form. Can you keep the back leg straight and the back quadriceps lifted as you bend the front knee deeply? Keep drawing the front thigh backward as you wrap the outer hip of the back leg forward. Is your waist long ? Maintain the awareness of pressing your back heel into the wall to lift your chest. Can you draw the energy of the legs up into the arms, hands and even fingertips?

I don't have a picture of me with my back heel against the wall, but notice how straight my back leg is.
Arm work: Gomukhasana arms. You can do this standing or seated. Focus on turning the top bicep in and keeping the upper arm in close to your head. Use a belt if your hands don't connect.

Thigh Stretch: Do EkaPada Raja Kapotasana II (Screaming Pigeon) at the wall. Make sure your standing thigh is verticalwith the foot moving towards the outer heel as it would in VIrasana (HeroPose). Observe that the knee of yourback leg is in line with, or behind its own hip. It should not be forward of the hip. The front knee has a tendency to cave in towardsthe midline, just as it does in Virabhadrasana II (Warrior II). Pay attention to that alignment. If your quadriceps are tight, it can causethe front leg hip to “hike” up. Thiswill shorten the waist on that side. Learn to observe the length on both sides of your waist. They should be even with your hipslevel. If you can maintain all of thisin your lower body, interlace your fingers, turn your hands inside out with thepalms facing foraward and raise your arms up alongside of your head in UrdhvaBaddhangulyasana, Upward interlaced fingers.
Grab your chair. (Itshould not be on a mat, as it will need to slide when you start to straightenyour legs.) Turn your chair to face thewall about 2 feet from the wall. Eventually,when you stretch your legs out straight, your feet should be touching thewall. (I didn’t do that in this picture,simply because I didn’t have a “nice wall” to put my feet up against for thephoto.) Get two blocks and place them infront of your chair. These are for youto sit on as you lie your head and shoulders backwards over onto the chairseat. With your knees bent, lift yourhips and shimmy backwards through the chair until you can slide your arms out throughthe back of the chair.
The arms:
Stretch your arms overhead into the air behindyou (as if you are doing Warrior I arms). This might be all you can do. Youcan press a block between your hands to work your arms.
Then, press your hands on the chair back, beginto arch your shoulders and upper back over the back of the chair. Your back should coil over the chair and notextend straight out. If it doesn’t coil,stay there and breathe for about 30 seconds and come out.
Once your chest begins to coil over the chairback, see if you can stretch your arms overhead and rest the back of your handson the floor. (Your head should not beon the floor.) Stay for a few breaths and come out.
If you can go further, bend your elbows andplace your hands on the floor as if you are about to press up into Urdhva Dhanurasana.Make sure that your wrists are wider than your elbows and not the other wayaround!
If you can get your hands to the floor, begin towalk your fingers back towards the chair legs and grab them. Roll your upper biceps and elbows in, the wayyou do in Gomukhasana arms.
Then slowly begin to extend your legs. Keep the legs parallel and the upper, innerthighs moving down towards the floor. Yourtoes and kneecaps should be facing the ceiling and you should be able to pressout through the inner edges of your feet into the wall. You may need to elevate your heels on blocksif you cannot keep them down on the floor with straight legs. (You may need ahelper for this.)
Now try Urdhva Dhanurasana and see how it feels. It would be interesting to do this every dayfor at least a month. Take a picture onthe first day and then after 30 days and see if there is any noticeableimprovement.

Urdhva Dhanurasana
Rest in Savasana with your calves supported on the chair seat to release your lower back.
(If you are interested in playing with this sequence, I will be teaching it and using the chair in my classes at the Solebury Club and at Dig. I do not have access to chairs at Cornerstone. You may attend classes on a drop in basis.)
Poses that you need to know how to do in order to do Wheel
The first pose that indicates a readiness for Wheel isCaturanga Dandasana, or low push up. This pose requires arms strength and it activates the muscles in theback which have to contract to lift your body up into Wheel. It is important totone the muscles that lift the body into Wheel, otherwise the flexibility willinvite weakness and pain for which beginners “have to pay heavily”, accordingto Geeta Iyengar.

Then the back bends, in order of learning:
Prone Position:
Back arches are introduced in the prone position first: Up Dog, Bow and Locust. These poses are done from the more externalspinal muscles. If the back hurts inthese positions, it indicates a defect in either the spine or spinal musclesand it is necessary to correct these problems before moving on, or the problemscan cause pain especially as the poses progress.
Upward Facing Dog

There are two ways to position the feet in both Caturangaand Up Dog. One is to be on the balls ofthe toes and one is to be on the tops of the feet. The first way tones the legmuscles and the second way tones the spinal muscles. This is important because back bends are donefrom leg strength. If the leg musclesare not strong enough to hold, that translates into pain in the spine,particularly the lower back. Therefore, one should tone the legs and thenlearn to adjust the spine by making the leg muscles strong.
Bow

In this pose, the body rests only on the abdominal area. Keep a firm grip on the ankles and useresistance between the legs and arms to raise the legs and chest further. Try to raise the knees and shoulders the sameamount. Often it is easier to raise oneor the other more.
Locust

In Locust, learn to work on the thighs and chestsimultaneously to keep them above ground and, as in bow, give them an equal amount of lift.
Locust and Bow act to strengthen the back and exteriorspinal muscles.
Camel

This is the first pose where you are lowering yourselftowards the floor rather than lifting up away from it. In the beginning the knees and feet are hipwidth apart. As you progress in thisposture, it is harder and more advanced to have the knees and feettogether.
Up Dog and Camel are preparatory poses for the more advancedback bends such as Wheel. IN performingthese postures, the student is asked to reflect on the curvature of the spineand the evenness of the spinal muscles. Does the spine bend more easily in one area than another? The work here is to create an evenness in thespine and muscles.
Often, while doing backward extensions, students experiencebreathlessness, hyperventilation, nausea, and headache in addition tobackache. They feel nausea and dizzinessas if they are having an attack of vertigo. It is mainly because of the stiffness of the spinal muscles andsluggishness of the liver. These twoasanas prepare the student, not only at the physical level but also at themental level, for removing such obstacles.
Wheel
Once you are proficient in Up Dog, Bow, Locust and Camel then Wheel will come easily.
Stretches to open your upper back for Wheel
Here are two great stretches to open up your upper back toprepare to do Wheel:
For this first one you can start in Hero, Crossed Leg Pose or simply stretch your legs straight. Using 2 blocks, make sure one block is under your upper back, between your shoulder blades. The other block is under your head. You can start with both blocks on the high side, if possible. Hold for 1 minute with the arms overhead holding opposite elbows. If you place the block under your head strategically, you will be able to rest your forearms on the block.

Then lower the head block to the medium height. Switch the way you are holding your arms and, if your legs are crossed, change the cross of your legs. You only need a small portion of the block for your head to rest on. Let your forearms rest on the block, too. Hold for 1 minute.

Then change the block to its lowest side, if you can. Again change the arm cross and the leg cross. If the head does not touch the block, then either put something on the block to make up the difference or stay at the height of the block where the head is still supported. Hold for 1 minute.

Finally, I went to no block and head on the floor. Go only as low as you can keep the headsupported on something. Hold for 1minute. When finished, come out slowlyand come onto all fours and do a couple of cat and cow stretches.

For the second one, place two blocks in front of a chair so that you can sit on the blocks and lay your upper back over the chair. Make sure that your head and shoulders are resting on the chair. Lift your buttocks up so that you are in a straight line from your knees to your head. Thread your hands through the back of the chair and either hold your arms straight and squeeze a block between your hands or bend your elbows and grab the back rung of the chair. Keeping your shoulders and head on the chair, begin to lower your buttocks toward the blocks without tilting your chin up. You end up using the front edge of the chair seat to leverage your upper back open. Hold for about 10 seconds and try to find 2 other spots on your back to leverage over the front edge of the chair. When finished, release your hands, slide your buttocks carefully down to the blocks and sit up.

This is not your mother's chair yoga

Visvamitrasana with a chair.
Sometimes I've had people walk out of class when I ask them to grab a chair as a prop. But this is not for the kind of chair yoga that most people think of. In the Iyengar style of yoga which I study and practice, a chair is used to help support the body as you open into greater ranges of strength and flexibility. Check out this way of entering into Visvamitrasana using a chair. Elevating the pose off of the ground by using a chair makes the pose that much easier and more accessible. Give it a try and let me know what you think.
The importance of bending your knee 90 degrees in the bent leg standing poses.
In the standing poses there are straight leg poses and bent leg poses. In order to work the legs, and all of the muscles and joints in their full ranges of motion, it is important to commit to the bend when doing bent leg poses and to keep the leg straight when doing straight leg poses. Bent leg poses strengthen the hamstrings and stretch the quadriceps; straight leg poses do the opposite. There are no “hybrid” poses in yoga. If the leg isn’t fully committed to being bent in the bent leg poses, all of the muscles surrounding the knee are tensed and the knee takes the strain. The same thing happens in the straight leg postures when the front leg is not fully straight. Muscles work in reciprocal pairs; when one muscle contracts the opposite one stretches.
The bent leg poses are introduced in Warrior II, Warrior I and Side Angle pose. These three poses all have the front knee bent 90 degrees. In the beginning, it is difficult to bend the leg that deeply. This can be due to tight hamstrings and adductors, tight quads and even a tight psoas in the back leg. But the depth of the bend can be increased over time. And it does have to be consciously worked on. As a teacher, I can often assess if a student is ready for some of the more advanced postures by looking at their ability to bend their knees and open their hips in the introductory standing poses.
It is important to know what you are actually doing in these poses. That is why I often recommend that students practice in front of a mirror. We often deceive ourselves with what we think we are doing. In Sanskrit this is called Avidya, or not seeing things clearly. It can be eye-opening to see what you are actually doing.
These introductory bent leg poses lead us into the more complex postures. The external rotation and bent leg in Warrior II is related to the external rotation and bent leg in poses such as Cobbler’s Pose, One-legged Pigeon and any of the Lotus variations.

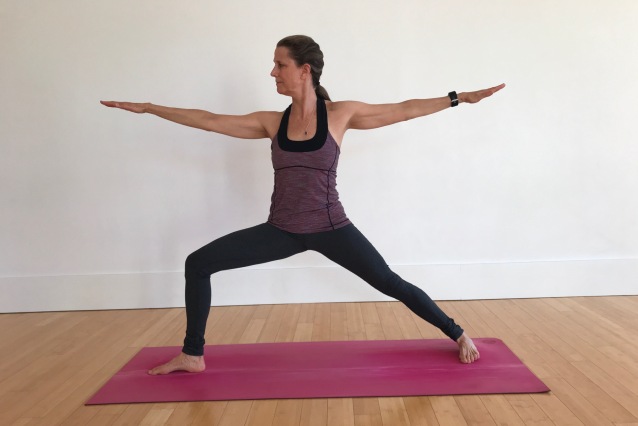
Warrior II
Watch this Yoga Journal video to see a 360 degree view of this pose.
In Side Angle Pose, it is hard to get the hand to the floor unless the front leg is bent 90 degrees. The stretch on the side of the body in this pose helps us to elongate and mobilize the torso for twisting. It lays the ground work for Revolved Side Angle Pose and forward bending postures such as Seated Tree and Revolved Seated Tree.
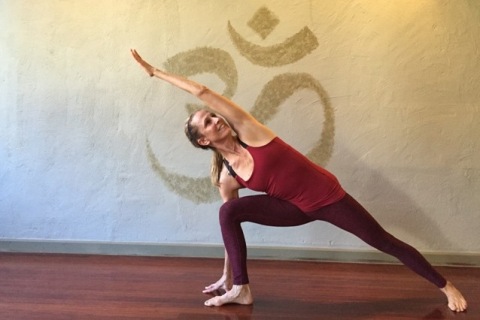
Side Angle
Watch this Yoga Journal video to see a 360 degree view of this pose.
Warrior I prepares us for back bends and for postures where one side of the body is forward bending and the other side of the body is back bending such as it is when doing a split. One-legged King Pigeon Pose has some aspects of this in it, too, as well as the external rotation of the front leg.

Warrior I
Watch this Yoga Journal video to see a 360 degree view of this pose.
Being able to bend your knee 90 degrees in these standing poses does not mean that you have to be able to do it today, but know where you are and where you are going. I have seen students who have been practicing yoga for years never learn to bend their front knee 90 degrees. And they have wondered why they have not made progress in their strength and flexibility.